Archive for the ‘holidays’ Category

straw and pompom garland tutorial

the straw and pompom garland hanging on a mirror

a straw and pompom garland

I ordered a bunch of natural straws from the lovely online shop, Imagination Childhood (they call them swedish straws). I bought them for another project (thursday’s tutorial!), but I loved working with them so much I wanted to make a simple garland with them too. Obviously this can be done with plastic straws or even some pretty paper straws, if you don’t have any swedish straws lying around. But the natural straws are, well, natural and because of the they are curved slightly and the colors are mottled and the surface uneven, all of which makes them pretty beautiful.

materials

materials for make a pompom and straw garland

To make this garland I paired the natural color of the straw with cream colored yarn, which is a little on the understated side (for me). I think bright, almost neon, pompoms in christmas light colors would look pretty fantstic too.

  • natural straws
  • bowl or pan in which the straws can lie flat
  • yarn
  • button thread (or any heavy duty thread)
  • yarn needle

directions

First you have to make some pompoms. If you have a pompom maker you are good to go, if you don’t that’s fine too–just use this simple tutorial over at Bella Dia for making pompoms using only your fingers. You can, of course use the little store bought pompoms too.

making pompoms

While you are making your pompoms put the natural straws in some very hot water to soak. This makes the straw less brittle and less likely to split when you cut them. They should sit about an hour–enough time to make a bunch of pompoms. When you are ready to use them, take them out from the water, drain and wipe them off gently.

soaking the straws

To cut the straws, make a mark on one straw every two inches. If your yarn needle is shorter than two inches, make your straws a little shorter too–this will make things a little easier when you make the garland. Then take about 5 or 6 straws, including the one you marked, in your hand and line them up. Then cut. Some might go flying, but if they are still a little damp they shouldn’t go too far.

cutting natural straws

Now take a long piece of thread, knot it, and stick it through a pompom. It might take a few tries before you find the right spot where the knot doesn’t go right through. Then alternate pompom, straw, pompom, straw. Finish with a pompom and hide the knot in the yarn. If you want to keep going but ran out of thread, ready another needle and thread (knotted) and insert the need where the last straw and pompom meet, then just keep going.

pompom garland on the tree

variations

Pretty paper stars also look nice between the natural straws. Popcorn might work, dried orange slices would look nice.  And I bet you can think of a bunch of other things too.

a christmas present for my lovely readers: a week of handmade ornament tutorials!

I will be accepting advertisers  on Elsie Marley starting January 2011. If you are interested in reserving a spot please email me and we can discuss the specifics! Thanks! elsiemarleyblog@gmail.com

holiday lists

I’m starting mine: cookies, cards, menus, gifts. I plan on making (and doing) much less this year than I have in the past, but somehow my lists are long anyway. There are always so many new cookies I want to make:

  • I’ve always wanted to try these christmas rainbow cookies.
  • these pistachio sandwich cookies look like a royal pain in the ass to make, but they also look freakin delicious.
  • I think super crispy gingerbread men sandwiched together with chocolate ganache would be good, do you think?
  • alfajores are definitely on the list this year (looks like sandwich cookies are the theme this year)
  • I’ve never made lebekuchen, but I do love it.
  • these mexican hot chocolate cookies look simple and really good.
  • I could go on and on

Martha somehow roped me in to buying another one of her christmas cookies magazines. And now the list is even longer and it might even have “make cookies that look like little mice” on it. Shesh. This is sort of why I shy away from making lists–I know there are so many of you out there that love them.  Mine start out small (laundry, post office) and then quickly get grandiose and undoable (paint the house, rip out kitchen counter). And then when only a few things get crossed off the list I feel awful and lazy and guilty (and, oddly, like the list is watching me).

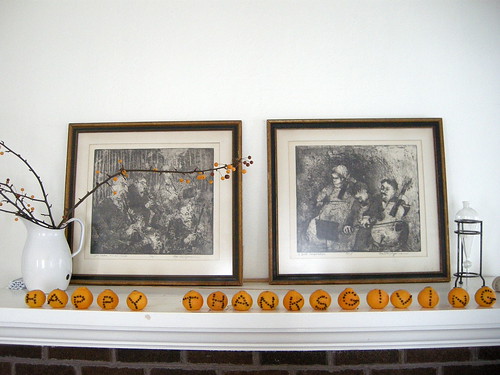
Enough of my guilt ridden midwesterness. I thought I’d share a few simple ideas from the archives for the holidays. The picture is from a few years ago when I realized I didn’t have any thanksgiving decorations, so I slapped together this project. Two years later I still don’t have any thanksgiving decorations and clementines on the mantel have become a little tradition.

English toffee is always the first christmasy thing I make every year: it freezes well and travel well and little nibbles sustain me through the season. You can find my recipe and tutorial here.

There is time to sew up this advent calendar before December 1st. Really, there is. I think it looks more complicated than it is: there is some simple machine sewing and then a movies worth of hand sewing.  The pattern and tutorial for the string of lights advent calendar is right here. We had an activity in each bulb last year and the kids and I loved it. I put the slip of paper in the night before, so a big project didn’t sneak up on me and because I’m last minute like that.

*****************************

And hey! you guys are awesome! Thank you so much for taking time out of your day to fill out my silly little survey. It was super helpful and makes me want to create more surveys so I can get to know you better. The consensus seemed to be you like the little blog just how it is, but wouldn’t mind if I change it up a bit: ads are ok, a recipe or two (if they are good), and more kid’s crafts, food, tutorials, and sewing!  Thanks to the commenter who said, “no pressure or anything!”  And thank you, everyone, for all the kind words. It was unexpected and so incredibly wonderful.

how to cross stitch on a pumpkin

This idea came about when Abbey from Aesthetic Outburst threw a fabulous birthday party with a “hand-stitched/granny chic theme” and as one of the decorations she painted a cross stitch design on a pumpkin.  The whole party was beautiful, but this idea was extra awesome and I thought maybe I could cross stitch for real on a fake pumpkin. The project turned out even better than I hoped and so I’m sharing it with you. I know there are only 5 days until Halloween, but this is a quick-ish project and the pumpkins will last forever.

How to Cross Stitch on a Pumpkin:

Materials

  • a fake pumpkin
  • thick yarn
  • a bamboo skewer (the ones you use for kebabs) or an ice pick or something similar
  • a yarn needle
  • a pencil

Directions:

1.) First you need to choose a design. I found some great, simple Halloween cross stitch patterns here, but feel free to design your own. It’s easier than you think, I made a bat and a boo! by playing around with Xs in my sketch book (go ahead and copy mine if you like). Just remember, simple is better for this project and try not to put any of the design near the hole on the bottom of the pumpkin because it’s very hard to stitch there.

2.) Next, transfer the design to the pumpkin. To do this, I looked at the pattern and then with a pencil I made very light dots for where the ends of the Xs go (see photo above). I thought about coming up with some complicated way to get your pattern perfectly onto the pumpkin, but really I love the look of free hand cross stitch and I don’t think it needs to be perfect.  If you want, you can lightly draw all the Xs on the pumpkin because the yarn will cover them up anyway.

3.) Now you need to poke all those holes. Take the bamboo skewer and poke straight down into the pumpkin.

4.) Ok, time to cross stitch. All I know about cross stitch I learned five minutes before I started this project! Thread your yarn needle with a piece of yarn no longer than your arm, no need to tie a knot. Stick you hand in the pumpkin (if you hand doesn’t fit or it’s a squeeze, do yourself a favor and make the hole a little bigger) and insert your needle into one of the holes you’ve made.  It can be difficult to find the right hole. To help, take your skewer in your other hand (the one not holding the needle in the pumpkin) and stick it in the correct hole, then by feeling for the skewer on the inside you can find it and draw your needle through. I started sewing at the bottom of my design and Xed my way around until I was done. It’s fastest to sew with both hands: one staying in the pumpkin and one out.

And that’s it. I think this project could go so many ways. A ghost done on a black pumpkin with some super fuzzy white mohair would look super cool. You don’t need to stick with cross stitch–any simple embroidered design would work. Go crazy with it and if you do be sure to add it to the elsie marley flickr group so we can all see! Happy Halloween!

valentine making party

On Friday all my kids’ friends came over for a valentines making party–yes all! have you ever had a party where every person you invited could come and then think holy crap! everyone is coming?  At the last minute a few kids couldn’t make it, so it wasn’t quite as chaotic as I thought it would be, but we are still picking glitter out of our hair (four days later).  The kids are still pretty young, so there weren’t any projects proper, it was a how many different things can you glue to one card sort of deal. My son’s inner glitter lover came out and he used up most of what we had.  Actually after the party was over my kids worked on their valentines almost until dinner time. They would get up from the table every once and a while and help themselves to the leftovers at the buffet. It was a rare day in motherhood where I was aloud to sit back, cuddle with the baby, and crochet as I please.

I got kinda themey with the food. It was supposed to be all heart shaped and red, but ended up rather brown and carby.  I made tomato focaccia from my bakery days and it was pretty good, at least the two dogs who finished it off thought so. These financiers were a total bust: they didn’t taste very good–and financiers are usually super delicious–and the heart effect was fussy as hell and didn’t work in the end.  Everything else was pretty run of the mill: heart shaped pb&js, red vegetables, trail mix. Martha’s raisin heart pockets were my favorite and I squirreled a few away to have with tea later.  I know valentines day is all about chocolateness, but these were nice and wintery, not too sweet and perfect with tea. I used golden raisins in the filling, but I think dried apricots with a little cardamom would be even better.  So go set up a little buffet for your kiddo’s lunch and open the glitter and savor some quiet time, or make some valentines yourself.  Next year we might skip the christmas cards all together and just send out valentines.

twenty fourth day of advent

santa

We are getting ready for lots of eating and merry making.  I hope you have lovely meals and lots of cookies in the coming days. I’m going to take a little break and I’ll see you all in the new yeat! Merry Christmas!

Download today’s coloring page here
See all the coloring pages so far here