Posts Tagged ‘yarn’

noro wrist warmers

noro wrist warmers

I have a rather large backlog of projects I want to share with you guys. The deadly cough/fever/will this go on forever? flu visited our house last week. We are all–finally!–crawling out from the sickness wreckage.

noro wrist warmers in progress

There has been much cozy making because of all the illness and I have rediscovered these wrist warmers I made in the fall. I never have been fully on the wrist warmer bandwagon.  When not done right, they tend to resemble arm support braces from walgreens–not really the look I’m going for.


noro wrist warmers

There is no mistaking these colorful guys for medical supply (I hope).  Last summer, a friend of mine was clearing out her yarn stash and I was the lucky recipient of some gorgeous variegated Noro sock yarn. There was only a bit left, so I needed a small project to showcase such awesome yarn.  There are only about a million patterns for fingerless gloves out there, so it took me a while to find something just right. I wanted simple, but not super boring, something that would show off the yarn, and be functional as well.

casually holding my coffee

I’m happy to say these check all the boxes. There are more details about my Noro wrist warmers on Ravelry if you are interested. Sometimes I forget how satisfying it can be to make something for yourself. Have you made anything for yourself recently?


this is wool from five green acres

portobello yarn by five green acres

Today I am super excited to introduce you to Mary Jo of Five Green Acres. I am lucky enough to know Mary Jo in blog life and real life. She is a whirlwind of creative energy! When she walks in a room you cannot help but be swept up in her projects and plans and insatiable curiosity about all things crafty.


This is wool. First Harvest: Backyard from Mary Jo, FiveGreenAcres on Vimeo.

Years ago, Mary Jo had an idea that started with carting home sheep in the back of her minivan. Since that day, she has thrown herself into raising sheep, grazing sheep, birthing sheep, and shearing sheep. If that weren’t enough, she then went on to clean the wool, card the wool, dye the wool, and spin the wool. And now yarn! gorgeous, squishy, soft, subtly colored yarn! Please watch this lovely video to see the birth of  beautiful yarn, named appropriately First Harvest.

first harvest yarn

Because we live so close, Mary Jo delivered a skein in that same minivan! Then my work began. I needed to find a project that was worthy of the yarn. A skein of First Harvest yields a precious 100 yards.  I asked her how she determined the weight and length of each skein:

When I set about spinning up the dyed fiber, I knew I wanted to make a yarn that could be knit up fairly quickly – something that was at least worsted weight or heavier.  The downside of this is that I can only fit so much on my spinning wheel’s bobbin before it becomes too full, limiting the length of each skein to about 100 yards.
Another thing about designing yarn – determining the gauge can be something of a guessing game.  It all depends on the size of needle (or hook) used, right?  I had determined that First Harvest was about a worsted weight, comparing it to other yarn I had in my stash, but now that I’ve added the yarn to the Ravelry database, I see that by their standards First Harvest is a Bulky weight.  Ravelry gets the final say, I suppose, so I’m changing my tune – Bulky it is.  The semantics of weight don’t matter as much in the actual working up of a project, as long as you do a gauge swatch, which we all do, every time, right?  Hee.


first harvest cowl

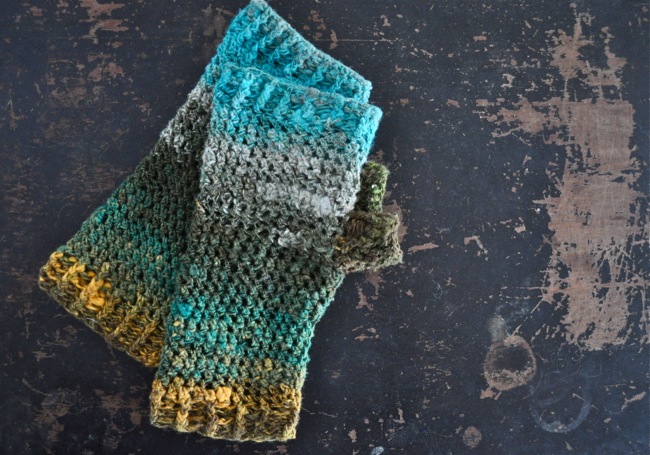
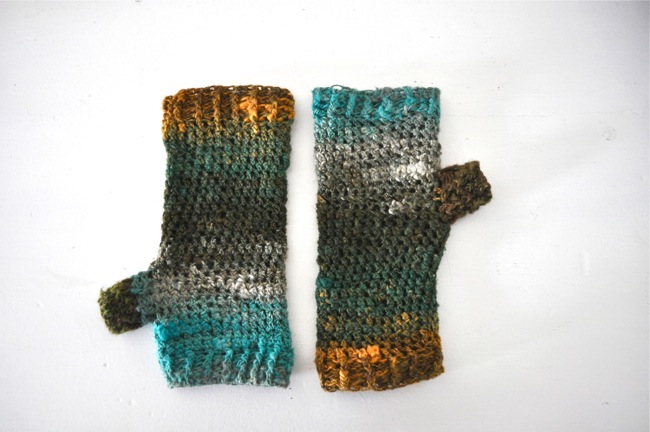
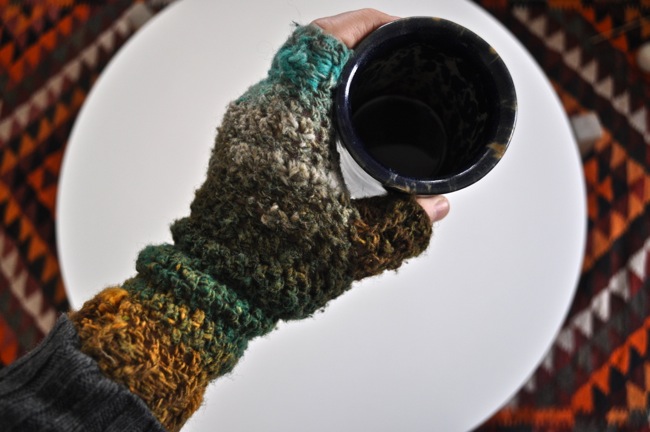
I of course did not swatch, so I crocheted and ripped and crocheted and ripped and crocheted and ripped. I couldn’t find a pattern that was special enough for the yarn and used just the right amount of yarn. Finally I gave up the never ending Ravlery pattern search and made up my own pattern (first harvest cowl pattern here).

  first harvest cowl

I came up with a pebble-y stitch that shows off the yarn beautifully. Mary Jo created this gorgeous gray/brown color with sumac berries of all things. She named it Portobello, which describes it perfectly: mushroomy, earthy, soft and loamy. Of course I’m not perfectly pastoral, so I added a stripe of shocking blue for the city side of things.

first harvest cowl

Visit Mary Jo’s blog, Five Green Acres (and shop, This is Wool) to see more of First Harvest and hear stories of her yarn from sheep to skein.


straw and pompom garland tutorial

the straw and pompom garland hanging on a mirror

a straw and pompom garland

I ordered a bunch of natural straws from the lovely online shop, Imagination Childhood (they call them swedish straws). I bought them for another project (thursday’s tutorial!), but I loved working with them so much I wanted to make a simple garland with them too. Obviously this can be done with plastic straws or even some pretty paper straws, if you don’t have any swedish straws lying around. But the natural straws are, well, natural and because of the they are curved slightly and the colors are mottled and the surface uneven, all of which makes them pretty beautiful.

materials

materials for make a pompom and straw garland

To make this garland I paired the natural color of the straw with cream colored yarn, which is a little on the understated side (for me). I think bright, almost neon, pompoms in christmas light colors would look pretty fantstic too.

  • natural straws
  • bowl or pan in which the straws can lie flat
  • yarn
  • button thread (or any heavy duty thread)
  • yarn needle

directions

First you have to make some pompoms. If you have a pompom maker you are good to go, if you don’t that’s fine too–just use this simple tutorial over at Bella Dia for making pompoms using only your fingers. You can, of course use the little store bought pompoms too.

making pompoms

While you are making your pompoms put the natural straws in some very hot water to soak. This makes the straw less brittle and less likely to split when you cut them. They should sit about an hour–enough time to make a bunch of pompoms. When you are ready to use them, take them out from the water, drain and wipe them off gently.

soaking the straws

To cut the straws, make a mark on one straw every two inches. If your yarn needle is shorter than two inches, make your straws a little shorter too–this will make things a little easier when you make the garland. Then take about 5 or 6 straws, including the one you marked, in your hand and line them up. Then cut. Some might go flying, but if they are still a little damp they shouldn’t go too far.

cutting natural straws

Now take a long piece of thread, knot it, and stick it through a pompom. It might take a few tries before you find the right spot where the knot doesn’t go right through. Then alternate pompom, straw, pompom, straw. Finish with a pompom and hide the knot in the yarn. If you want to keep going but ran out of thread, ready another needle and thread (knotted) and insert the need where the last straw and pompom meet, then just keep going.

pompom garland on the tree

variations

Pretty paper stars also look nice between the natural straws. Popcorn might work, dried orange slices would look nice.  And I bet you can think of a bunch of other things too.

a christmas present for my lovely readers: a week of handmade ornament tutorials!

I will be accepting advertisers  on Elsie Marley starting January 2011. If you are interested in reserving a spot please email me and we can discuss the specifics! Thanks! elsiemarleyblog@gmail.com

crochet fail

There have been a few crochet projects recently that I have just had to rip out–that cute and jumpy word “frogged” is just not going to cut it here, because I spent precious time working on them, they looked liked hell and then I had to start the fuck over. Here is one example:

This is what happens when you try and crochet over a paper lantern. I wanted a new light fixture for our bedroom because staring at a cheap paper lantern hanging from a bare bulb starts to looks extra crappy in the wee hours of the morning (when you are nursing and staring at the ceiling, wrecked from nursing all night long) but didn’t have any extra cash to get one, or really even make one. I thought lantern would look nice and cozy with a crocheted cover. I had some extra chunky white yarn from this project, so I quickly got to work. I’ve never really made up a pattern from scratch before and it was a little more frustrating than I thought it would be and it took a lot longer. And then because I was running out of yarn and stretching it just a little too tight literally with the very last stitch I broke the shade. Shit. Yeah yeah, maybe it a good thing, now when I make it again I might be able to write a pattern, but still, shit.

I am working on another crochet project (my sewing machine is gathering dust!) and it has not failed yet.


Hexagons for a bathmat. It’s a japanese pattern and my first project worked from a crochet chart (I found it on ravelry here and here is the original site). I’m warming up because I bought this book and I want to make every single project in it. Speaking of ravelry, it looks like there is a sewing equivalent getting going call The Woven! There are a lot of sewing forums out there that are great (craftster, cut out and keep) but this looks more like ravelry and it’s nicely thought out. It would be a welcome addition I think.