Posts Tagged ‘christmas’

geometric straw ornament tutorial

geometric straw ornament

a lovely geometric straw ornament

This is a traditional eastern european ornament and garland. The shape is simple, but a little tricky the first time you make it. After you get the hang of it many three dimensional geometric shapes are possible. I think it makes for a nice modern, but still natural christmas ornament. Like the other tutorial I used straw for, this one can of course can be made with plastic or paper straws, but if you would like to use natural straws, I found mine the at the imagination childhood online shop.

materials for geometric straw ornament

materials

  • natural straw
  • button thread (or other strong thread)
  • yarn needle

directions

First you need to soak the straws and cut them into 2inch pieces. I explained this in detail in my tutorial for a straw and pompom garland.

1.Take a piece of thread about twice the length of your arm and thread the yarn needle–no need to knot it. String four straw pieces almost to the end of your thread. Pull the threads until the straws meet, but don’t pull too hard or you will split the straws. Then tie a square knot (that’s the plain old kind).  You can trim the end, but don’t cut the working thread.

2. Now pull the thread through two straw pieces and

3. secure them at the opposite end.

4. Thread two more pieces and tie at the top (the opposite end you just strung them from)

5. Take your needle back through one of the straws, so it comes out in the middle.

6. String one straw at a time securing it where the next straws meet. Do this four times and tie a knot.

Trim all your threads and decide which way you would like it to hang. Loop your thread at the top point and tie it together. Now hang up that nice looking ornament you just made.

geometric straw garland on a picture

You can keep going and make a double ornament, or keep going and going and make a whole garland! If you do, I would suggest making them one at a time and then tying them all together. Making these with a long piece of thread doesn’t really work: it gets tangled and it’s bothersome.

geometric straw garland on the tree

a christmas present for my lovely readers: a week of handmade ornament tutorials!

I will be accepting advertisers on Elsie Marley starting January 2011. If you would like to reserve a spot please email me and we can discuss the specifics! Thanks! elsiemarleyblog@gmail.com

straw and pompom garland tutorial

the straw and pompom garland hanging on a mirror

a straw and pompom garland

I ordered a bunch of natural straws from the lovely online shop, Imagination Childhood (they call them swedish straws). I bought them for another project (thursday’s tutorial!), but I loved working with them so much I wanted to make a simple garland with them too. Obviously this can be done with plastic straws or even some pretty paper straws, if you don’t have any swedish straws lying around. But the natural straws are, well, natural and because of the they are curved slightly and the colors are mottled and the surface uneven, all of which makes them pretty beautiful.

materials

materials for make a pompom and straw garland

To make this garland I paired the natural color of the straw with cream colored yarn, which is a little on the understated side (for me). I think bright, almost neon, pompoms in christmas light colors would look pretty fantstic too.

  • natural straws
  • bowl or pan in which the straws can lie flat
  • yarn
  • button thread (or any heavy duty thread)
  • yarn needle

directions

First you have to make some pompoms. If you have a pompom maker you are good to go, if you don’t that’s fine too–just use this simple tutorial over at Bella Dia for making pompoms using only your fingers. You can, of course use the little store bought pompoms too.

making pompoms

While you are making your pompoms put the natural straws in some very hot water to soak. This makes the straw less brittle and less likely to split when you cut them. They should sit about an hour–enough time to make a bunch of pompoms. When you are ready to use them, take them out from the water, drain and wipe them off gently.

soaking the straws

To cut the straws, make a mark on one straw every two inches. If your yarn needle is shorter than two inches, make your straws a little shorter too–this will make things a little easier when you make the garland. Then take about 5 or 6 straws, including the one you marked, in your hand and line them up. Then cut. Some might go flying, but if they are still a little damp they shouldn’t go too far.

cutting natural straws

Now take a long piece of thread, knot it, and stick it through a pompom. It might take a few tries before you find the right spot where the knot doesn’t go right through. Then alternate pompom, straw, pompom, straw. Finish with a pompom and hide the knot in the yarn. If you want to keep going but ran out of thread, ready another needle and thread (knotted) and insert the need where the last straw and pompom meet, then just keep going.

pompom garland on the tree

variations

Pretty paper stars also look nice between the natural straws. Popcorn might work, dried orange slices would look nice.  And I bet you can think of a bunch of other things too.

a christmas present for my lovely readers: a week of handmade ornament tutorials!

I will be accepting advertisers  on Elsie Marley starting January 2011. If you are interested in reserving a spot please email me and we can discuss the specifics! Thanks! elsiemarleyblog@gmail.com

crochet pillow and crochet links

crochet pillow wip

I’m nursing a pretty brutal cold that seems to be going around (and around and around), so I’m doing some quiet crocheting while the baby naps. I started this project for Erin’s pillow week, but even though I was (and still am) very excited about the idea I got bored with the actual making of it.  I may be getting ahead of myself–seeing as I’m not even done yet–but I’d like to make up a pattern for the pillow. But again, I have to finish first and then felt it and then see if it even turns out and probably test it again. So don’t hold your breath.

crochet projects and links
1. linen snowflake (ravelry link) 2. acorn shrug (login required, here’s a finished project) 3. jam jar cozies 4. granny basket

These patterns, on the other hand, are finished and free for the taking. They are all crochet and all dead easy. It seems I only start crocheting in earnest when the weather turns cold (last year I went crochet crazy) and today it feels a little like winter outside. Anyway I think all these projects would make pretty gifts (to yourself even) and would quickly satisfy the need to work with yarn. It becomes strangely addictive that yarn.

I know I talked up my advent calendar the other day–which I have to dig out of the basement this weekend–but I rediscovered Sarah’s very simple and infinitely adaptable blank advent calendar she so posted a few years ago. I think I may make a photo version for the grandmas.  Not that I don’t have a thousand other things to do! I’m working on some handmade ornament tutorials and patterns for next week. There will be 4 for sure and maybe if I kick this cold 5! So stay tuned and have a happy thanksgiving!

string of lights advent calendar pattern

Here it is, the string of lights advent calendar tutorial (and pattern!). I made the pdf pattern file all by myself for the first time, so if you have problems with it just email me and I’ll try to fix it. Otherwise, hurry up! because advent is almost over!

materials

green wool felt
multi-color felt scraps
60 feet green yarn
green embroidery thread
lightweight treats (gum balls, dum dums, love notes, tiny ornaments)

pattern

download here

directions

Cut the yarn into six equal pieces (10 feet each or 120 inches each or about 3 meters each). Take three pieces and braid them together. This is more difficult then it sounds, but if you roll up the slack and just work with a little yarn at a time it’s much easier. Braid the other three together the same way. Then twist the two braids together and knot the ends.  It will stay twisted when you sew the lights to it.

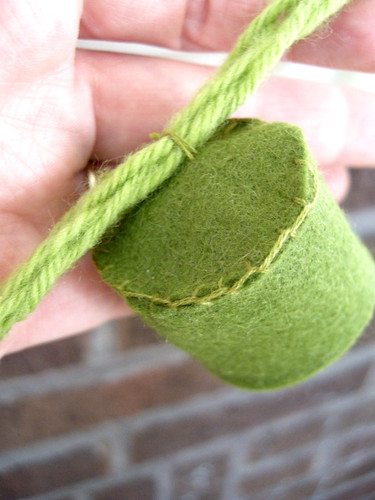
Cut out 25 (or 24 or however many lights you want) circles and rectangles. Create the socket by sewing a blanket stitch to the edge of rectangle and the circle attaching them to each other.  If the rectangle is slightly longer than the circumference of the circle clip it to fit and continue sewing the ends of the rectangle together. Sew the sockets onto the cord–one every three inches.

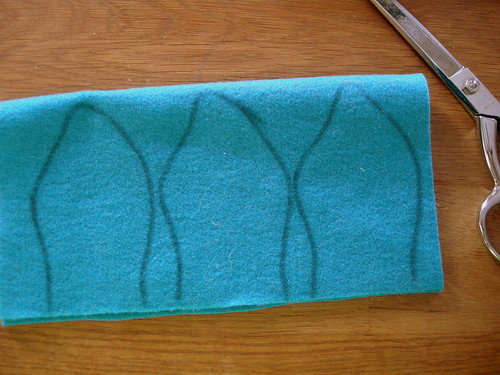
Cut out the light bulb pattern piece. To sew the lights up faster you can fold your colored felt over and simply trace the pattern onto it with a marker (permanent or not it doesn’t matter) then sew the two pieces together staying inside the lines.  To be safe test the first light to see if it fits: sew and turn out, put a treat or two inside, then fit it inside the socket and see if it stays when it’s hanging upside down. If it slips out, just make the lights slightly bigger.  If you’d rather use the lights for decoration and not for treats you can stuff the light bulbs lightly and sew them onto the socket.

I didn’t really finish the ends of the cord (I just tied a knot on both ends).  But it would be sweet to make a little plug out of felt to hide the knot. To do this cut out four extra “socket bottom” circles and two extra rectangles.  Cut a slit in the middle of one of the circles and insert your knot, then attach the rectangle, just like you did for all the sockets, and attach the other circle to the other side–making a  round (European style) plug. You can even make some prongs out of felt to complete the look.

download the pattern here.

advent calendar

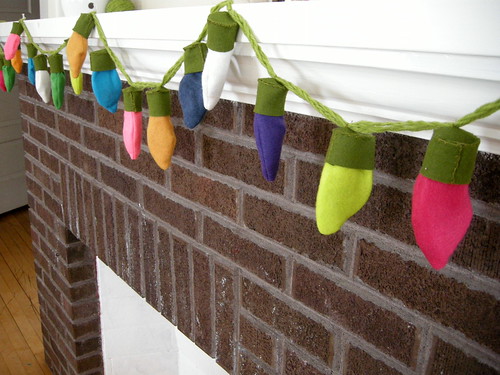
Ta da! The advent calendar is done, well pretty much done. It’s a string of chirstmas lights.   One of you guessed correctly! But there were some good ideas out there: an advent abacus, a ferris wheel.  Next year.  There are only twenty lights, but I figure I’ll save some making for next christmas or add them if I have time this month (ha!). There are treats in the bulbs and the lights fit in their little sockets, but they aren’t held in by anything–just the power of felt.  This calendar is for lightweight treats only or bits of paper with sugarless activities on them. I went with candy because my kids are still young enough to think it’s the best thing in the universe.

I’d be happy to write up a quick tutorial (with patterns) if there are a lot of you that would like to make one. It’s not difficult at all.  The hand sewing is a little time consuming, but it’s nothing a few movies won’t fix. If you sewed the bulbs on it would make a nice Christmas decoration for this year (or next).  If you’d like to see more pictures of it you can click here and here.  And there are lots more fantastic calendars here and here.