Posts Tagged ‘kids’

tin foil noodles

The other day we wrapped some tin foil in noodles. I thought they made for a pretty stylish necklace.

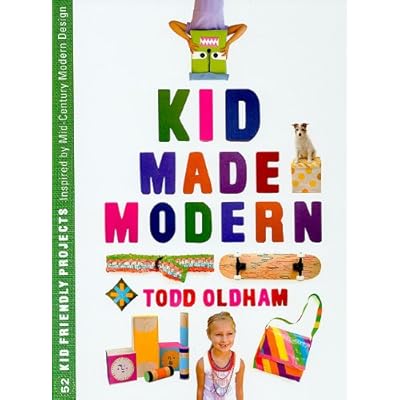
The project came from Todd Oldham’s awesome book Kid Made Modern. His first book, Handmade Made Modern, was decent, but this one is super fantstic. I think it’s aimed at kids around the ages 7-12, but there are some projects little ones can do and I would have loved it as a teenager–really even if you don’t have kids there are some super styish ideas you can steal.

In the book, Oldham takes mid century designers–Isamu Noguchi, Marimekko, Alexander Calder, Paul Rand, Charles and Rae Eames and so many more–tells you a little about them and their art and then presents a couple projects inspired by their work. The projects are organized by material–many of them recycled–or technique.   The printing, cardboard, tape and dye sections are some of my favorites, but I was taken by most of the projects.

I  didn’t mean for this to become a full on book review (I was just going to tell you about the noodles) but I think this is a fantastic craft book that is well put together and well thought out. And definitely not only for kids. If you feel like wrapping noodles in tin foil–you really don’t need the book for this project– but I would dab a little bit of glue on the noodle before you roll it up. We didn’t and I kept finding bits of tin foil around the house for the rest of the week.

Oh and look there is a kid made modern website with some extra projects and little videos, check it out!

sheets

All my kids have odd size beds. Our bedrooms are quite small, so to fit all the kids in them we got two extendable beds from Ikea. My son has the leksvik and my daughter has the super cute minnen.  They start out about toddler size and then you can make them longer as the children get, well, longer.  The baby has a wooden travel crib, sort of like this, that I got off craigslist for next to nothing. He is just about to outgrow it, which sucks because it fits perfectly in the corner of our room.

The Ikea beds are kind of awesome and kind of annoying (that pretty much describes everything at Ikea, doesn’t it?).  The only sheets that fit them are of course at Ikea and they are uncharacteristically boring: I think the options were red or blue. This past week I finally got around to making some fitted sheets for everyone. I made them out of vintage sheets I picked up at the thrift store:  sheet from sheets–not my most creative moment.

There are a bunch of tutorials out there on how to make fitted sheets, so I won’t bore you with how I did it (though, if there are a lot of you out there with these Ikea beds I could rustle up the measurements I used).  Between these sheets and the thousand pairs of elastic waist pants I’ve made, I am done with the whole pushing the safety pin through the casing crap. I know there is a tool out there that makes this bearable, isn’t there? When I find it I’m going to retire my extra large, sad, bent up safety pin.

mud pie kitchen

I was so taken with this mud pie kitchen that I found on the crafty crow, that we went right outside and made one of our own.  I moved some little tables around and the kids wondered around the yard gathering decorations, then we dug up some dirt from the garden and went to work. The kids insisted on wearing aprons and washing their hands before they started.

There go the cupcake into the oven. They were very serious about the whole affair–my son even made me set the timer.

When they were done with their cakes they went on to other things, but I might do a little rearranging in the new kitchen and keep it up for the rest of the summer.

The baker showing off her wares.

the princess dress

I’m really not one for the whole princess thing. And I thought we had avoided it, until on her fourth birthday my daughter wished that “all princesses would be sparkly.” There has been a health dose of princessness since then, even though I rarely ever buy princess paraphernalia–and wow you can buy just about anything save for major appliances with a princess slapped on it.

It’s not so much the prince saving the princess that annoys me, it’s the total lack of substance on the part of the princess. Well, that and the rampant consumerism of it all (see above).  For the most part the princess just lies around looking pretty all day long. Because of that I rejected them outright until I found myself looking at a fashion magazine in the check out line and realized it was just grown up princess crap. So I guess if I can indulge in pretty girly things, I can indulge my daughter a little too.

And so the princess dress. It’s not sparkly or even very flooffy, but it’s pink and princessy and she loves it. The pattern is from Carefree Clothes for Girls and with it’s quilted bodice (that’s for you nan) and raw edges it’s more Cinderella before the ball than at the ball. The pattern was easy and a lot like the other dress I made from the book. The only part I couldn’t figure out were the button loops. There was a diagram on how to make them, cut I couldn’t decipher it out, so I just crocheted some chains with quilting thread and sewed them in. And it worked out well, washes up nicely, and gets dirty often. For me it’s a dress with a silly amount of baggage, but to her it’s just a pretty dress to pick flowers in.

wooden tangram tutorial

I’m sure you know what a tangram is but didn’t know it was called a tangram (when I looked it up, I think I might have typed, “that clever triangle-y puzzle thing”). If you’ve never even seen one, well then: it’s sort of a puzzle and sort of a game that involves five triangles, one square, and one parallelogram.  The objective is to figure out how to make a given shape, which is shown only in silhouette, using the pieces and not overlapping any.  My kids and I had a blast just playing around with the shapes and seeing what we could make. I thought you might like to make some too:

Materials:

  • balsa wood (or sturdy cardboard, foam core, or actual wood wood, but you will need different tools for cutting the wood)
  • a sharp pencil
  • ruler
  • exact-o knife
  • fine grit sandpaper
  • paint brush and paint (optional)

Directions:

1. Use an exact-o knife to cut the balsa wood into a 4 inch square.  The piece of balsa wood I got at Michael’s Crafts was 4 inches wide already, so I only needed to cut it once to make a square.

2. Next you need to draw a 1 inch grid on the square very, very lightly. Draw a line one inch from the edge, then another one inch from that, one more and then turn the square 90 degrees and do it again. If you press down on the balsa wood at all it will make an indentation that won’t come out, so keep the pencil marks very, very faint.

3. Now we are going to draw 5 lines. I think it would be more confusing for me to explain where all the lines are drawn, so you can just follow the series of lines I drew above. Use the grid as a guide: draw through the corners, or on the lines, whichever is indicated by the picture. The first picture is the grid and the next five show the sequence of lines to draw.
4. Lightly erase the grid.
5. Take your exact-o knife and ruler and cut on the lines. Cut the shapes out in generally the same order you drew the lines. If you have a sharp blade it should take 3 or 4 passes along the line to cut through the balsa wood. It helps if you start a little above where you are cutting, instead of starting right on the line. Go slow and try to keep the blade perpendicular to the wood.

6. Lightly sand the pieces.

7. Paint (if you like). It’s nice to have both sides painted–especially the parallelogram–because it makes it easier to make more pictures with your tangrams, but I think they are equally beautiful not painted at all.  It’s up to you.

You can even make a little cute box for your new tangram set to go in. The box I got was a little too small for the pieces to fit just right–oh well.  Now go play: you can make animals, letters, quiltscookies even and this book looks lovely too. Watch out though, you might get carried away: