post office bag tutorial
August 6th, 2008
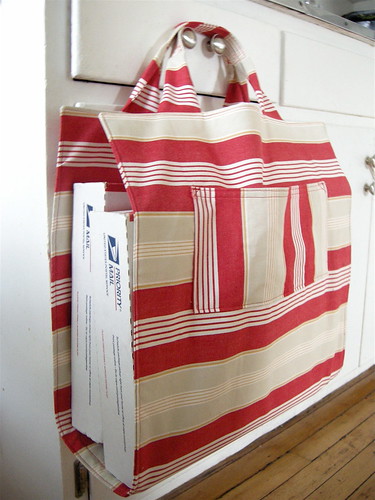
Now that I have an etsy shop I find myself at the post office more than ever. Along with all the packages I have to carry I have a stroller to push and a toddler’s hand to hold. The packages are always weird sizes and never seem to fit in a paper bag, so I came up this handy dandy post office bag. It’s just a long piece of fabric with some handles and pockets, but it works like a charm. The pockets are sized to fit a long envelope and there is one on each side. I put my receipts, my stamps, and my custom forms in the pockets so they don’t get lost in the bottom of my purse or the diaper bag (which they usually do). I figured since there are so many etsy sellers there must be a lot of you who have this package transport problem (kids or no kids) and so I wrote a simple tutorial for this super easy bag. It shouldn’t take more than a couple hours from start to finish. And if you make one drop me a line so I can see!
post office bag tutorial
materials
- 1 1/2 yards heavy duty fabric (I used some home dec fabric I had on hand, but canvas, denim, corduroy, or even twill would work)
- a little more than 1/2 yard interfacing (somewhat stiff)
- thread to match
directions
CUT:
- two 18″ X 40″ pieces of fabric
- one 18″ X 40″ pieces of interfacing
- four 3″ X 18″ pieces of fabric for the handles
- two 7″ X 12″ pieces of fabric for the pockets
SEW:
- fuse or sew the interfacing to the wrong side of one of the large pieces (this will be the lining)
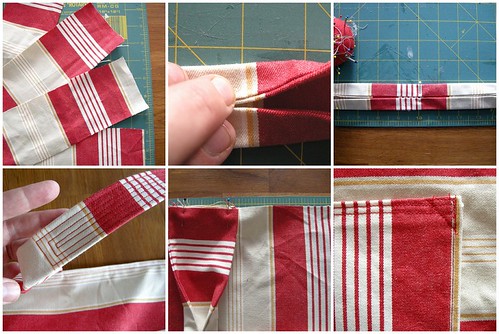
- with wrong sides facing sew each of the two handles together
- turn out and press
- find the middle of one of the handles and fold the long sides in to meet and pin
- continue the fold 4″ out from the middle on either side and pin
- do this to the other handle and press both
- your handles should have a 8″ folded part in the middle and the ends will still lie flat
- sew concentric rectangles on the folded area to anchor it down
- stop to admire your work
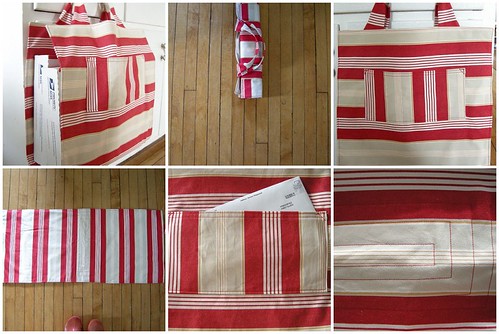
- take the two pocket pieces and fold the short sides in 1/4″ and press and 1/4″ again and press
- do the same on the top and bottom
- sew the across the top of both the pockets
- pin the pockets 5″ inches from each short side of the outside piece.
- sew the pocket on and reinforce the top two corners (with an X or a triangle)
- pin the handles to end of the lining, right sides facing (you should see the fold line)
- place the outside piece on top of the lining right sides facing (pocket should be down) and sew all
- around with a 1/2″ seam, leaving an opening for turning out
- trim the seams, turn out and press
- topstitch all around
- create a bottom by stitching large concentric rectangles equidistant from both the handles
- that’s it! you’re done! off to the post office…
To see any of these pictures in more detail, please go to my flickr site. If there are any problems with this tutorial, please tell me . It turns out it’s much harder to explain how to make this bag than it is to actually make it!


what a fabulous idea. my mom made something similar when i was young for carrying firewood up from the basement. hopefully i will get enough orders from my etsy to need one. i just opened up shop yesterday(wed.)
genius, that’s genius.
thank you! :)
Well, geez! Could you be any more clever? I’m guessing, yeah. Your projects are very clever and useful and fun. Love it. Thank you for sharing.
Great idea! I usually head to the post office with a pile of envelopes that is threatening to fall on the floor at any moment. this is a perfect solution!
Lovely, sweet bag. I carry my packages in a very unattractive USPS plastic box. Very dull. I may think about somehow making a nicer box since I go every day. Also if you are interested in tips on how to ship from home I would be happy to walk you through what I do. I don’t have to stand in line at all any more.
This is very cool, could have used it a few years ago. Now I schedule almost all of my deliveries online, saves tons of gas! I still think I want to try & make, very cute!
I love the fabric! and what a handy solution to carrying packages.
That is such a nifty bag, I could really use something like that during Christmas when I’m mailing out the most packages.
I should learn to sew first lol.
This is cute! But have you ever considered getting boxes from USPS sent to your house, paying online and just having the mailman pick up the boxes from your house as he delivers your other mail? That way you don’t have to waste time in line and you don’t have to lug your tots around.
Excellent design, very much like a log carrier for wood burning fireplaces.
Meg,
I got my make it yourself book in the mail this week. I’d totally forgotten it was coming so yay for the surprise! Thanks, and here’s to 1000 more comments in your near future.
: )
Julie
That is just perfect.
i think i’m going to make an etsy shop just so i can make one of these bags…
[…] feature is from Elsie Marley with Post Office Bag Tutorial, this is one super-neat bag! Now that I have an etsy shop I find myself at the post office more […]
So smart! I love this.
This is so cute. But, I don’t understand what keeps the packages from falling out the sides? Can you explain? Sorry, I am trying to visualize. I know what you mean about needing more hands. I remember how frustrating it was to try to get a todler and a stroler into the library (so I could read to them and be a perfect mother!!)with the heaviest doors on earth!!On top of that, our children’s dept. was down in the basement, down these scary open stairs! Ugh1 This bag would come in handy for books, I think.
[…] Tutorial To Create A Post Office Bag […]
What a great idea.At posting standing in line with box’s and letter are a big pain this would sure help got to make one thank you so much for the tutorial .Thumbs up on this one and you can if you had one of these.
Very clever!!!
hugs ginger
This is so cute and so original! Two of my favorite combinations. Great work!
[…] From the why-didn’t-I-think-of-that files: Very handy-looking Post Office bag. […]
What an attractive idea! Great tutorial. I’m going to show this to my mom. She will love it! Thank you for sharing
[…] 3. post office bag tutorial […]
[…] internet, you most likely find yourself heading to the post office often. And if you’re like Elsie Marley, those packages can get difficult to cary when you’re trying to tote along kidlets and purses […]
[…] Office Bag Meg’s Post Office Bag Tutorial via elsie marley is the perfect thing for your letters and packages. It will help you keep track of […]
[…] sends the right message to the editors and/or agents you wish to woo? Whip up this handy dandy Post Office Bag (via Sew Mama […]