post office bag tutorial
August 6th, 2008
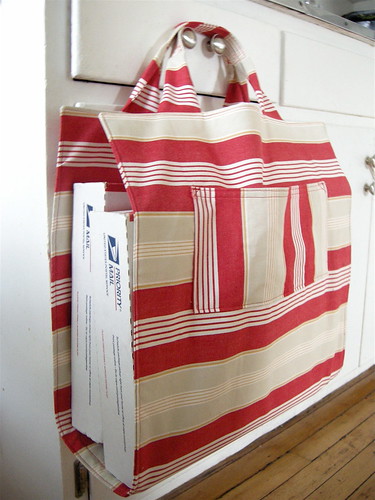
Now that I have an etsy shop I find myself at the post office more than ever. Along with all the packages I have to carry I have a stroller to push and a toddler’s hand to hold. The packages are always weird sizes and never seem to fit in a paper bag, so I came up this handy dandy post office bag. It’s just a long piece of fabric with some handles and pockets, but it works like a charm. The pockets are sized to fit a long envelope and there is one on each side. I put my receipts, my stamps, and my custom forms in the pockets so they don’t get lost in the bottom of my purse or the diaper bag (which they usually do). I figured since there are so many etsy sellers there must be a lot of you who have this package transport problem (kids or no kids) and so I wrote a simple tutorial for this super easy bag. It shouldn’t take more than a couple hours from start to finish. And if you make one drop me a line so I can see!
post office bag tutorial
materials
- 1 1/2 yards heavy duty fabric (I used some home dec fabric I had on hand, but canvas, denim, corduroy, or even twill would work)
- a little more than 1/2 yard interfacing (somewhat stiff)
- thread to match
directions
CUT:
- two 18″ X 40″ pieces of fabric
- one 18″ X 40″ pieces of interfacing
- four 3″ X 18″ pieces of fabric for the handles
- two 7″ X 12″ pieces of fabric for the pockets
SEW:
- fuse or sew the interfacing to the wrong side of one of the large pieces (this will be the lining)
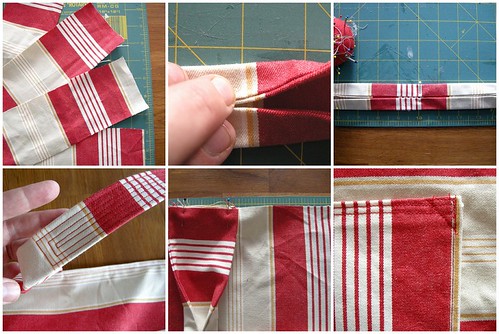
- with wrong sides facing sew each of the two handles together
- turn out and press
- find the middle of one of the handles and fold the long sides in to meet and pin
- continue the fold 4″ out from the middle on either side and pin
- do this to the other handle and press both
- your handles should have a 8″ folded part in the middle and the ends will still lie flat
- sew concentric rectangles on the folded area to anchor it down
- stop to admire your work
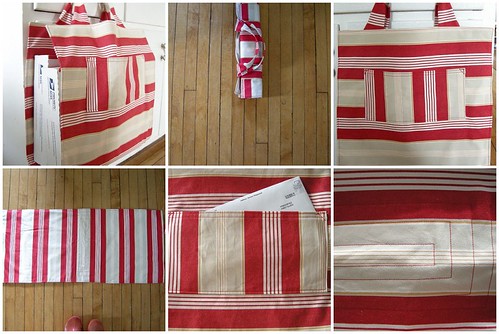
- take the two pocket pieces and fold the short sides in 1/4″ and press and 1/4″ again and press
- do the same on the top and bottom
- sew the across the top of both the pockets
- pin the pockets 5″ inches from each short side of the outside piece.
- sew the pocket on and reinforce the top two corners (with an X or a triangle)
- pin the handles to end of the lining, right sides facing (you should see the fold line)
- place the outside piece on top of the lining right sides facing (pocket should be down) and sew all
- around with a 1/2″ seam, leaving an opening for turning out
- trim the seams, turn out and press
- topstitch all around
- create a bottom by stitching large concentric rectangles equidistant from both the handles
- that’s it! you’re done! off to the post office…
To see any of these pictures in more detail, please go to my flickr site. If there are any problems with this tutorial, please tell me . It turns out it’s much harder to explain how to make this bag than it is to actually make it!


love it!
[…] you see her Kid Clothes Week?!) and we’re so happy to welcome her as an SMS board member. Meg shares solutions, reworks things ’til they’re right and shows via her blog that sewing is a creative, […]
FABULOUS! You are awesome!!!! Thank you for sharing your creativity.
[…] certainly do, but I couldn’t quite bring myself to purchase one. I remembered Meg’s Post Office Bag Tutorial and thought, well hey. I could make that. And so I […]
very interesting and useful! I’d like to cite this on my blog!
[…] Post Office Bag […]
[…] Post Office Bag Tutorial […]
[…] Büchertragehilfe […]