happy homemade sew-along: day two
June 17th, 2014
Welcome to day two of the Happy Homemade Sew-along! Yesterday, Cherie showed you how to trace the hoodie pattern and add seam allowances. Today we’re going to cut out the fabric and do a little prep before we sew. Ready?

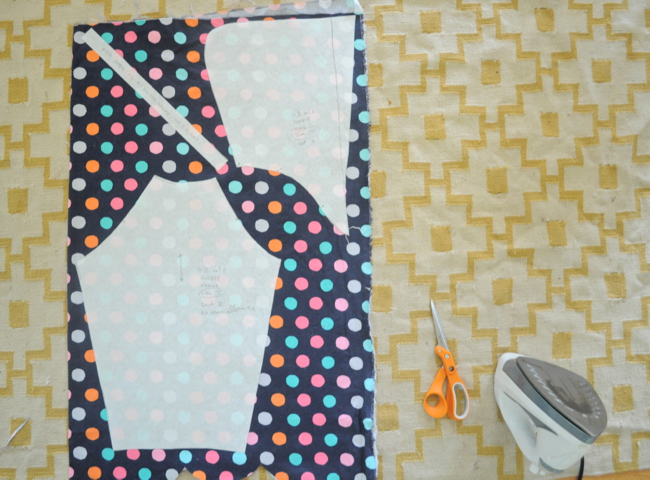
The diagram for cutting out your fabric can be a little confusing. You have to look very carefully how the fabric is folded. This is the only way you know how many of each pattern piece to cut out. For reference I’ve listed all you need to cut out:
- 1 front piece on fold
- 1 back piece on fold
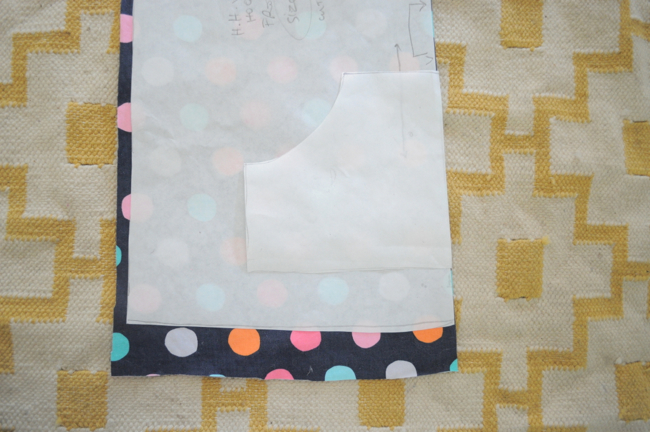
- 2 sleeves
- 2 hood pieces
- 2 neck facings on the bias

First fold your fabric so the selvages meet in the middle. Then line up the front and back pattern pieces on the fold and cut out (photo above). Then unfold your fabric and re-fold it in half. Layout the sleeve, hood, and neck facing (photo below).
I made some changes to a few things here. The hood has always seemed a little small to me. So I angled the front forward a bit. You obviously don’t have to do this if you don’t want to. But you do have to make the neck facing wider. There isn’t a pattern piece for the neck facing, just a measurement: 7/8 x 13 3/4. When I cut out the fabric for the neck facing I added about a 1/4 inch to the width (see below). If you use the measurements given, there is no room for any error when you are sewing. Better to give yourself a bit of wiggle room.

I also cut out a kangaroo pocket. I sketched out a shape and then put it on top of the front pattern piece to see if it looked right. Easy peasy. You can either cut out 1 pocket and hem it before you sew it on or cut two and sew them right sides together before you sew it on your hoodie.
Now there is a bit of prep work, which I have to admit I’ve never done before even though I’ve made this hoodie 3 or 4 times. :)
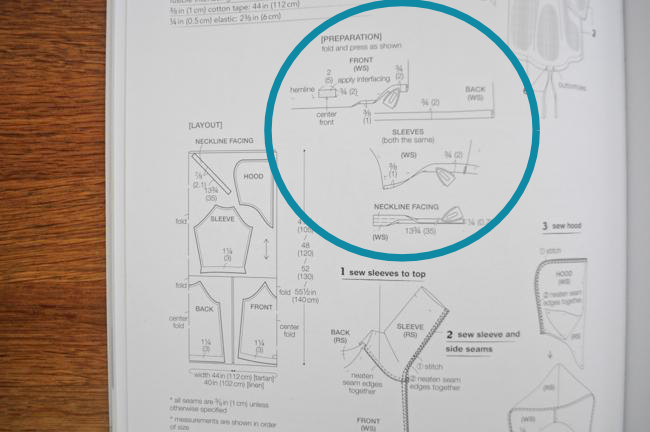
They ask you to fold up and iron the hems on the front, back, and sleeve pieces. Then apply a little interfacing where the button holes will go: in the center of the front piece, above the second fold line.

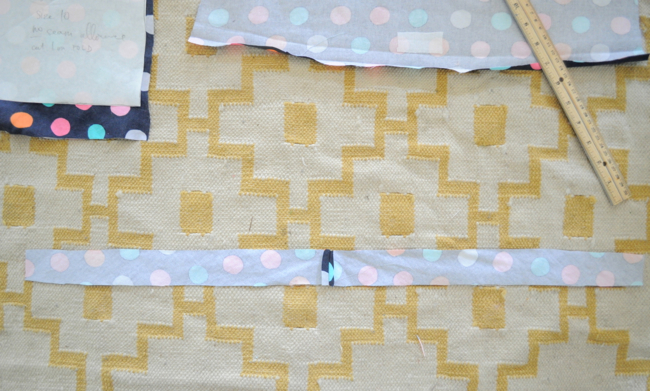
Lastly, you need to make your bias tape. Sew the two ends together (if you have enough fabric you can cut the bias strip on the fold). Fold the strip in half lengthwise and press. Then open it up and fold the raw edges into the center and press.
Volia! Tomorrow on Cherie’s blog, we’ll actually sew something!
See the rest of the sew-along posts here:


This is a great post, but I’m rather a novice. Should the fabric be laid out as shown-with the pattern-side up, or should the fabric be pattern sides together? And, bias tape-again noviice-how wide should that be? Thanks again!
Yes- pattern side up- just as in the pictures. Thant way when you cut out on the fold one half is identical to the pattern piece and one half is the mirror image of the pattern piece giving you the complete shape. Hope that helps.
I think Louise answered your first question. The bias tape should be about 1inch wide when laid out flat.
Do you think it would work to line the hood with a contrast fabric? I wonder if doing this would impact how the neck facing is applied…
And thanks for the great sew-along!
I’m planning on lining the hood. @theinspiredwren posted a photo the other night on instagram with the hood lined in a contrasting fabric and it looked fantastic.
Thank you! I’ll check it out.
Angela, Cherie’s post today talks about this, if you haven’t sewn up the hood yet: http://youandmie.com/2014/06/18/happy-homemade-sew-along-day-three/
I like your polka dot fabric, what is its makeup?
It’s like a light twill.
[…] over to Elsie Marley for Day 2 of the Happy Homemade […]
[…] Three! So we’ve prepped our pattern and cut our fabric and we’re finally ready to sew! Today we’re going to be doing steps 1-3 of the […]
[…] Hoodie Inspiration Mixing it Up Fabrics What you’ll need Schedule and Sew-along Prize Day One Day Two Day […]
[…] we’re finishing up with steps 5 and 6. If you prepped the hems back on Day 2, these steps are super fast. But even if you didn’t, it shouldn’t take us long to […]
Hi I know I should know this but I can’t find it ? what fabric is this its so cute thanks!
Nat, why would you know what fabric I used?! It’s a twill-like print from Joann’s.
Hello!
I am a follower of this sew-along (although I don’t think I can actually do the sew-along). I have a few questions:
1. When placing pattern paper on the fabric, I notice you place it on right side of the fabric (not wrong side). Is this always the case with Japanese sewing?
2. I also notice that you did not add the seam allowance on the paper pattern pieces, rather cut the fabric a bit wider than the paper pattern for seam allowance. I’m confused since the book tells me to trace the paper pattern and add the seam allowance on the paper pattern. Do you mind clarifying?
Many thanks in advance!
Claire
Claire, to answer your questions:
1. the fabric is folded in half wrong sides together, so when I cut out the pattern pieces they will be mirror images.
2. Yes, you are supposed to add it to the paper pattern, but I sometimes prefer to add it when I’m cutting out.
I hope this helps! Happy Sewing!
[…] sewing went pretty well, especially with the help of Meg and Cherie in their Sew-Along posts. I learned a ton about navigating Japanese sewing books […]
[…] come forward far enough to fit properly, and it pulls at the back of the parka when it’s up. Meg angled hers forward for more coverage, which I’d recommend if you want it to serve as an actual hood. I […]
Hi, I’ve never used interfacing before. What type and weight of interfacing do I use? Woven lightweight?
[…] adding the kangaroo pocket, lining the hood and also adjusting the shape of the hood slightly. Meg mentioned the hood being too small, so I also angled the straight edge of my hood forward and then I rounded […]
[…] Hoodie Inspiration Mixing it Up Fabrics What you’ll need Schedule and Sew-along Prize Day One Day Two Day Three Day Four Day […]
[…] Hoodie Inspiration Mixing it Up Fabrics What you’ll need Schedule and Sew-along Prize Day One Day Two Day Three Day Four Day […]
Hi!
I also made the hood bigger like you offered but as a result I have something like a beak sticking out ;))))))))))))) what did I do wrong?
[…] DAY TWO […]