tin can cover
May 12th, 2008
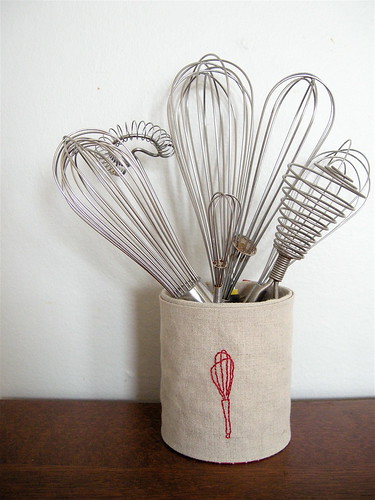
This project is from an old issue of Cotton Friend, a japanese magazine that my husband brought back for me from Singapore. These are incredibly handy and I have many more in the works: for all the crap little things in my studio and all the markers, crayons and glue sticks that are under the couch. I thought you would like to make some too, so I whipped up a tutorial. Here you go:
Materials:
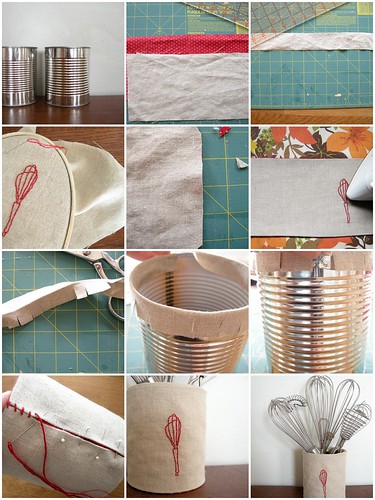
28 oz. tin can (if you have a different size can, just measure the height and circumference, add seam allowances, and the rest is the same)
linen, or other fabric
lining fabric
embroidery floss
glue (I used rubber cement, but plain white glue should do just fine)
Directions:
Wash your tin can and take off the paper. Cut two 13″ X 4.75″ rectangles–one from linen and one from the lining fabric–and one 13″ X 1.5″ strip of linen. Embroider the design of your choice on the fabric or leave it plain if you like. Place the two large rectangles together right sides facing, and sew around using a 1/4 inch seam allowance. Leave a 2 inch opening in the middle of one of the short sides for turning out. Clip the corners, turn and press (I like to press it so a little of the lining shows). Sew the opening closed. Fold the strip of fabric in half the long way and press. All the way along one side clip almost up to the fold. Glue the unclipped side to the inside of the tin can, then glue the outside. Wrap the finished piece around the can and sew shut (I like my stitches to show, but you could of course use an invisible stitch).
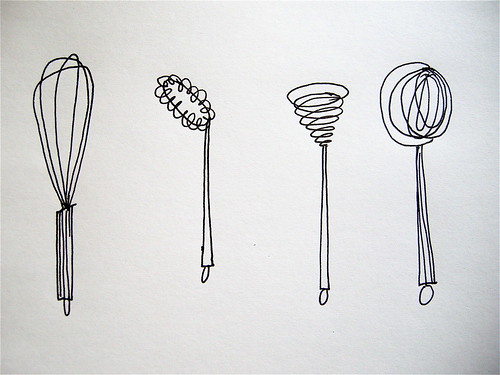
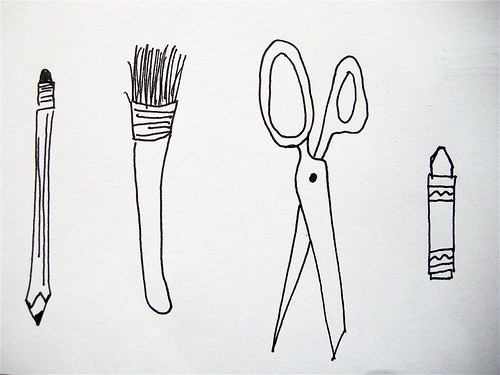
I was planning on having a pdf file with embroidery designs you could download, but I’m not having much luck with that at the moment. Until I figure it out here are pictures of the designs you can print out and use (you will probably have to resize them a bit). If you want to see these or any of the instructional photos more clearly, click over to my flickr site.
Edited to add: please click here and you can download both sets of designs for your own stylish, embroidered tin can cover.
drop me a line if you make one!


Nifty!
super, it’s cool i would like to make one. Can i use your picture and the link to your blog to put on my blog for french girl???? sorry for my english !! Thank’s
emma’sfamily
lovely!!!!!!
adorable. love the whisks
So gorgeous! I definitely need to make one of these to hold pencils. Don’t really understand why you’d line it though… all that beautiful fabric is never seen. Wouldn’t it be enough to just press the edges under?
Very cute and so handy! Okay, next on my list of projects. Thanks!
I love this idea in using up what I might otherwise throw away. I may make some for presents.
[…] tin can cover at elsie marley Such a cute idea and great for recycling – I love the little kitchen utensil and office embroidery patterns! […]
this is such a great idea, love your designs, TFS
What a great idea! I love it.
wow – i love this!!
Wow, so very cute! I LOVE Japanese craft mags and books, am in fact obsessed with them; I’m going to Japan in a month–could be big trouble! Anyway, thanks for sharing. Cute wedding gift idea or hostess gift, no?
This is so cute what a clever idea i have to make one.
Also going to post this on my web site so others can get this idea.Thank you so much for sharing it with us all. hugs & big smiles
[…] Fabric Covered Tin Can: Use this as utensil holders or for desktop organizing…great way to recycle cans as well as use up some fabric scraps. Add a little hand embroidery if you like for some extra pizazz. […]
[…] by Sarah Craft: had a link to a great tutorial from Elsie Marley the other day – how to make a tin can cover – that I just couldn’t […]
Thanks for sharing, I have so much need for this!! Your tin looks so pretty!
I used cans for decorating the table a few weeks ago too: I had written the menu on a thick paper, cutted out the words and sewed them on some felt together with all kinds of buttons and little figures representing the menu (for ex.: a bee for the honey sauce,..) And inside the can there were a few flowers, it looked very nice too!
[…] My contribution to the Functional Felt Swap. These were made with hand-dyed wool felt. The material was bought at a yarn and fiber store, it’s so beautiful and textural. I was inspired by Meg’s tutorial here. […]
I *knew* there was a reason I was hanging on to all those coffee cans. This is great!
just loved the idea. I’m always collecting the cans but never had the perfect idea to reuse them. I have now =D
me too…been hanging on to coffee cans…this is so great!!
[…] ♥ Not into making clothes? Try this adorable Tin Can Cover. […]
I love those illustrations! They are right up my alley.
What a terrific project! Your blog is so fun… great ideas and lovely photography!
Dear Elsie:
I made this tin can cover using your tutorial and it turned out great! You can see it here:
http://juliealvarez.blogspot.com/2008/06/semana-hecha-mano-handmade-week.html
Thanks a lot!