Posts Tagged ‘bag’


My friends came up with this wonderful tradition of creating a “nursing bag” when one of us has our second baby. I don’t know if it’s customary to have baby showers for the second baby, but really, why not have a party (especially if it involves fondue). So when there is a baby shower for a second (or third or fourth) one of us makes a bag and the rest of us stuff it full of crayons and stickers and little games–things to appease the older child with while you nurse the baby for the thousandth time that day. I volunteered to make the nursing bag this time and couldn’t decide whether to make a little kid’s bag or a stylish one for the mama, so instead of either I made a bag for the house. The pattern is from the ever talented jchandmade and you can find it here. I thought it would be good to have one upstairs and one downstairs, so I made two. They are super easy to make and I have another cut out for all the random little bits around our house. I followed the pattern pretty much to the letter, except I fused the interfacing to the lining because I don’t like that wrinkly look it gives to the fabric and I didn’t have any “cotton webbing” (and honestly I don’t even know what it is) so I just made a handle by sewing 2 strips together, turning them out and quilting them. Now go make your own.
Posted March 3rd, 2009 in sewing. Tagged: bag, kidlet, sewing.

Ingrid from lottielulu.blogspot.com!
Thank you everyone for playing along (all 250+ of you!). If you’re peeved that you didn’t win you can hop on over to my shop and buy the little people bag pictured above. There will be more of these in the shop early next week. You can subscribe to my etsy shop’s RSS feed so you always know when new things are available.
Thanks again! It was amusing hearing what everyone had for breakfast. Turns out there are two camps: those who eat pastries for breakfast and those who eat leftovers from dinner last night. And it turns out there are a whole hell of a lot of craft blogs out there. If you are new here I hope you’ll look around and I’ll try to work my way through the hundreds of blogs that are new to me!
Posted December 4th, 2008 in misc. Tagged: bag, etsy, kids, sewing.

It’s giveaway day (thanks to sewmamasew) and I’m giving away this little people bag. It’s a drawstring bag made of muslin with vintage inspired little people appliqued on the front. Tell a joke, tell me what you ate for breakfast, ramble on and on, whatever, just leave a comment if you’d like to win the bag. There are a ton of blogs giving away all kinds of stuff today, so go forth into the internet and win all your christmas presents.
*edited to add: the drawing will end at 8am central time tomorrow december 4th.
THE CONTEST HAS ENDED, BUT STICK AROUND THERE’S LOTS TO SEE HERE.
Posted December 3rd, 2008 in sewing. Tagged: bag, drawstring, giveaway, little people, sewing.
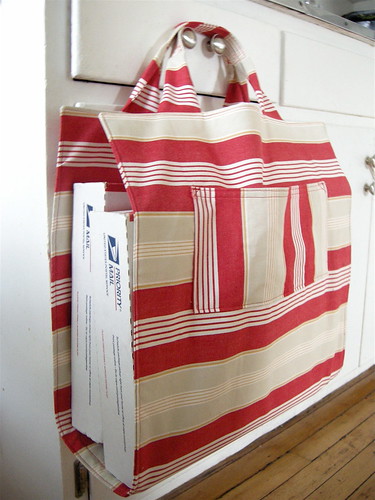
Now that I have an etsy shop I find myself at the post office more than ever. Along with all the packages I have to carry I have a stroller to push and a toddler’s hand to hold. The packages are always weird sizes and never seem to fit in a paper bag, so I came up this handy dandy post office bag. It’s just a long piece of fabric with some handles and pockets, but it works like a charm. The pockets are sized to fit a long envelope and there is one on each side. I put my receipts, my stamps, and my custom forms in the pockets so they don’t get lost in the bottom of my purse or the diaper bag (which they usually do). I figured since there are so many etsy sellers there must be a lot of you who have this package transport problem (kids or no kids) and so I wrote a simple tutorial for this super easy bag. It shouldn’t take more than a couple hours from start to finish. And if you make one drop me a line so I can see!
post office bag tutorial
materials
- 1 1/2 yards heavy duty fabric (I used some home dec fabric I had on hand, but canvas, denim, corduroy, or even twill would work)
- a little more than 1/2 yard interfacing (somewhat stiff)
directions
CUT:
- two 18″ X 40″ pieces of fabric
- one 18″ X 40″ pieces of interfacing
- four 3″ X 18″ pieces of fabric for the handles
- two 7″ X 12″ pieces of fabric for the pockets
SEW:
- fuse or sew the interfacing to the wrong side of one of the large pieces (this will be the lining)
- with wrong sides facing sew each of the two handles together
- turn out and press
- find the middle of one of the handles and fold the long sides in to meet and pin
- continue the fold 4″ out from the middle on either side and pin
- do this to the other handle and press both
- your handles should have a 8″ folded part in the middle and the ends will still lie flat
- sew concentric rectangles on the folded area to anchor it down
- stop to admire your work
- take the two pocket pieces and fold the short sides in 1/4″ and press and 1/4″ again and press
- do the same on the top and bottom
- sew the across the top of both the pockets
- pin the pockets 5″ inches from each short side of the outside piece.
- sew the pocket on and reinforce the top two corners (with an X or a triangle)
- pin the handles to end of the lining, right sides facing (you should see the fold line)
- place the outside piece on top of the lining right sides facing (pocket should be down) and sew all
- around with a 1/2″ seam, leaving an opening for turning out
- trim the seams, turn out and press
- topstitch all around
- create a bottom by stitching large concentric rectangles equidistant from both the handles
- that’s it! you’re done! off to the post office…
To see any of these pictures in more detail, please go to my flickr site. If there are any problems with this tutorial, please tell me . It turns out it’s much harder to explain how to make this bag than it is to actually make it!
Posted August 6th, 2008 in tutorials. Tagged: bag, handmade, post office, sewing, tutorial.

This is what all those little things on my desk became–a toy bag for little people. It’s up in the shop along with another toy bag (puzzles) and there are more on their way. This week was making stuff for the shop week and though I’m pretty excited about this new design, not much more than that got done. I only ventured down in my studio about half of the evenings I was supposed to–I’m a crappy boss to myself I guess. But there are somethings cut out for the shop that I really want to finish (city skirts and county skirts too!), so I’m just going to keep at it next week. After that we’ll be off to the middle of nowhere on vacation. A whole week! without the internet! I’m guessing there will be cable in the cabin so that kind of evens out the time suck factor. There will also be an enormous lake so I’m not expecting to get much done, but that is the point of vacation anyway isn’t it?
Posted July 5th, 2008 in sewing. Tagged: applique, bag, etsy, fisher price, handmade, kids, sewing, toys, vintage.


