Posts Tagged ‘sewing’

If you don’t know about the two talented ladies from Sugar City Journal, now you do. They make ridiculously stylish and modern and cute and functional clothes for their kids. And I have been waiting patiently for their patterns to be published. Luckily, I was first in line when they came out and snatched up the pattern for the village frock dress. I’m hoping it will become my little girl’s chirstmas dress. And I was thinking about making it in velvet (or velvette) but the more I think about it the more expensive it sounds. And I’m guess velvet is hard. Any suggestions?
The picture is the packaging (duh). It’s made out of a paper bag and stitched at the sides. On the pattern itself it says, “you are a sewing genius.” Yeah! And here’s the back of the package because it’s as nice as the front.

Posted September 9th, 2008 in inspiration, sewing. Tagged: packaging, pattern, sewing.

This was my month for the one quilt project. I was pretty picky with the instructions (well I’m picky, I can’t help it) and the fabric choices were not super thrilling (unless you like gray as much as I do). But I did ask everyone to incorporate a 3D or textural element into their block, which I was pretty excited about. Granted, I have no idea if this will even work in a quilt, but whatever. I used pleats for my block and thought it turned out well until I read my directions and had to add another strip of fabric to make it the right size. I’m going to put all the blocks in a line down the middle of the quilt. And once (if) it gets done it will go in our bedroom, because I spilled bleach all over our quilt. real swift, meg.
Posted August 19th, 2008 in swaps. Tagged: gray, pleats, quilt, sewing.

I found this great Alexander Henry print after reading Last Minute Patchwork Gifts (which is fantastic) and falling for the whole cloth quilt that’s in the book. I finally got around to putting the quilt sandwich together at the last craft night (yee haw! red wine and sharp scissors!). The back turned out pretty good–if I do say so myself.

everything wasn’t so wrinkly when I put it together I swear. It’s been folded up in my bag waiting for me to attempt the hand quilting. Anyone have any advice? The baby isn’t even born yet (no, mom, I’m not pregnant) so I’m way ahead of schedule. For once. And if the olympics keep sucking me in and making me stay up waaay past bedtime, then it’ll be done it no time.
Posted August 17th, 2008 in sewing. Tagged: giraffe, handmade, quilt, sewing, wip.
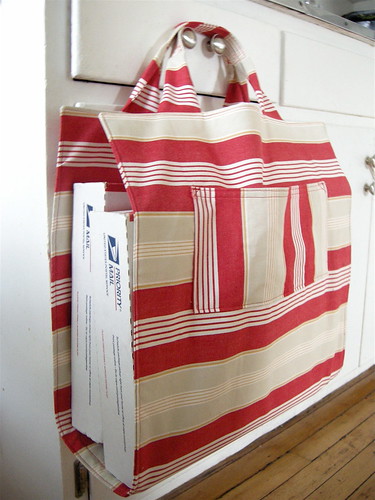
Now that I have an etsy shop I find myself at the post office more than ever. Along with all the packages I have to carry I have a stroller to push and a toddler’s hand to hold. The packages are always weird sizes and never seem to fit in a paper bag, so I came up this handy dandy post office bag. It’s just a long piece of fabric with some handles and pockets, but it works like a charm. The pockets are sized to fit a long envelope and there is one on each side. I put my receipts, my stamps, and my custom forms in the pockets so they don’t get lost in the bottom of my purse or the diaper bag (which they usually do). I figured since there are so many etsy sellers there must be a lot of you who have this package transport problem (kids or no kids) and so I wrote a simple tutorial for this super easy bag. It shouldn’t take more than a couple hours from start to finish. And if you make one drop me a line so I can see!
post office bag tutorial
materials
- 1 1/2 yards heavy duty fabric (I used some home dec fabric I had on hand, but canvas, denim, corduroy, or even twill would work)
- a little more than 1/2 yard interfacing (somewhat stiff)
directions
CUT:
- two 18″ X 40″ pieces of fabric
- one 18″ X 40″ pieces of interfacing
- four 3″ X 18″ pieces of fabric for the handles
- two 7″ X 12″ pieces of fabric for the pockets
SEW:
- fuse or sew the interfacing to the wrong side of one of the large pieces (this will be the lining)
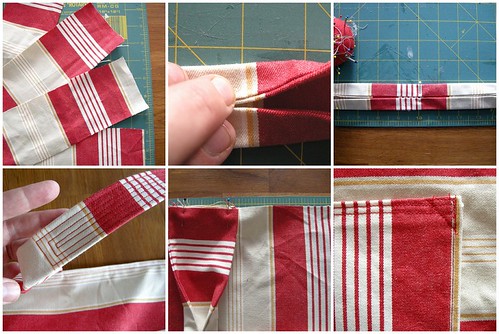
- with wrong sides facing sew each of the two handles together
- turn out and press
- find the middle of one of the handles and fold the long sides in to meet and pin
- continue the fold 4″ out from the middle on either side and pin
- do this to the other handle and press both
- your handles should have a 8″ folded part in the middle and the ends will still lie flat
- sew concentric rectangles on the folded area to anchor it down
- stop to admire your work
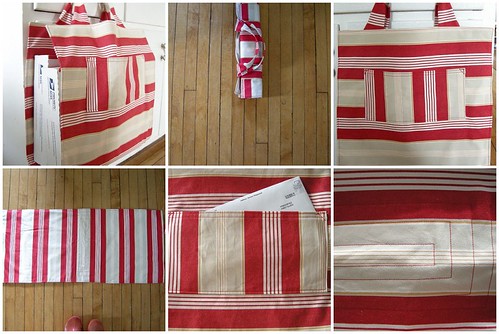
- take the two pocket pieces and fold the short sides in 1/4″ and press and 1/4″ again and press
- do the same on the top and bottom
- sew the across the top of both the pockets
- pin the pockets 5″ inches from each short side of the outside piece.
- sew the pocket on and reinforce the top two corners (with an X or a triangle)
- pin the handles to end of the lining, right sides facing (you should see the fold line)
- place the outside piece on top of the lining right sides facing (pocket should be down) and sew all
- around with a 1/2″ seam, leaving an opening for turning out
- trim the seams, turn out and press
- topstitch all around
- create a bottom by stitching large concentric rectangles equidistant from both the handles
- that’s it! you’re done! off to the post office…
To see any of these pictures in more detail, please go to my flickr site. If there are any problems with this tutorial, please tell me . It turns out it’s much harder to explain how to make this bag than it is to actually make it!
Posted August 6th, 2008 in tutorials. Tagged: bag, handmade, post office, sewing, tutorial.

Sometime you just have to pat yourself on the back for making the damn pillow already.
Posted August 3rd, 2008 in sewing. Tagged: fabric, pillow, sewing, summer.


