Posts Tagged ‘linen’

kid clothes week part two

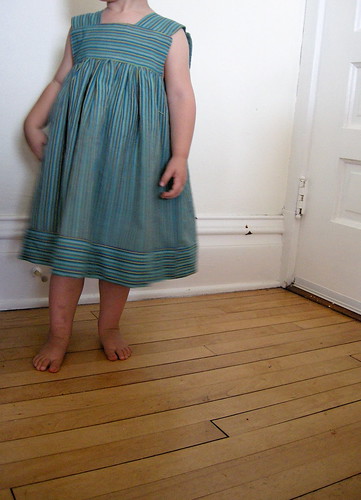
When I made a plan to just sew one kind of thing for a week, it was a good plan and I should have stuck to it. I completely lost my momentum and now it’s just a chore to go down in my studio.  Sewing from actual patterns didn’t help.  Everything was going fine and then suddenly:  step 12. put in zipper or step 7. sew continuous lap.  I still need a little hand holding when it comes to zippers (and who the hell wrote the instructions on the zipper package anyway? because they’re crap) and they could at least define continuous lap even if they’re not going to tell me how to do it.  I did figure them both out (thank you internet) but they are definitely a little off. A continuous lap is where the buttons are in the cuff of your sleeve, if you’d like to know.  You cut a slit in your fabric and then sew a piece of fabric to it in order to hem it, but not make it any smaller.  That’s very confusing, sorry–maybe that’s why they didn’t explain it in the instructions. Anyway, it’s on the back where the buttons go on this striped jumper.  The striped jumper that’s too big. Oh well, at least it’ll fit for sure next summer. I just can’t figure out sizing with patterns. I measured her and picked the size that matched, but I guess it just runs big, like one size too big.  The same thing happened with the other pattern I made.

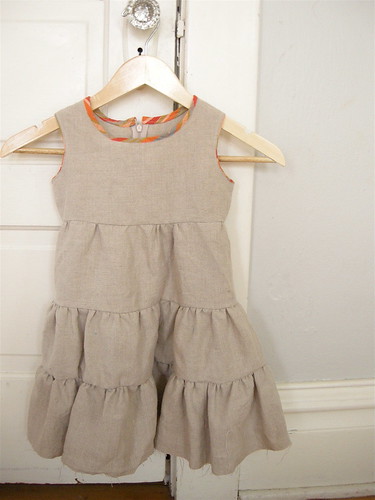
But this is heavier than I expected–Joann’s linen is not the finest quality, duh–so it might work well as a fall jumper.  I haven’t hemmed it yet because I can’t decide whether or not to use the striped fabric I used on the collar and armholes or just fold it up and hem it.  If I use the striped fabric do you think I need to make bias tape, or can I just cut it straight?

So I have a few things to finish up this week for my kids and other people kids, but next week I’m moving on whether I’m done or not.  But when I do get back to sewing kid’s clothes I’d like to be able to sell some, but I don’t have the foggiest idea how to size them.  Does anyone have any good resources about this?

*edited to add*  both the patterns I got at a thrift store, so I don’t know if they still sell them, but the striped number is Simplicity 6500 and the one with ruffles is Butterick 6089.

kid clothes week

I kept my word and worked (almost) every evening this past week on my kid’s wardrobe.  Actually I had such a good time I’m going keep at it this week.  Mostly I used tutorials, but I’m working on some patterns too. The two skirts are from the twirly skirt tutorial by Erin from house on hill road.  It is a seriously twirly skirt–my daughter calls it her swirly skirt.  The tulip fabric I picked up at the thrift store and there was just enough.  A good friend gave me the fish fabric and even though there was only a quarter of a yard (about half of what is called for) it still twirls a little. I looked forever to find a tutorial for the shirts. I knew what I wanted, but didn’t want to spend 10 bucks on a pattern for something so simple.  I finally found it on Just Tutes, which is a fantastic resource for kid’s clothes (click here to go right to the shirt tutorial).  I made the yellow one first and it’s ridiculously small (I’m worried it won’t even fit the 4 month old babe it’s going to) and the second one I made is too big, so I’m guessing next time I’ll get it right.  That’s the problem with sewing at night–no one is around to try anything on.  The striped pants are for my son and I blatantly ripped off the design (and fabric choice too) from Leah of go monkey designs, but she did a much better job (serves me right). I traced a pair of my son’s pants for the little shorts and made up the cuffs and tabs as I went a long.  I used a contrasting bright green thread for all the details and damn if it isn’t stylish.  They turned out better than I had hoped and have been worn and washed many times already.

whew! if you’d like to see bigger and better photos head over to my flickr site.

Do you have any good garment making tutorials to share? I’m kind of addicted, so if you know of any good ones–for kids or adults–please leave a comment so we can all see. thanks.

tin can cover

This project is from an old issue of Cotton Friend, a japanese magazine that my husband brought back for me from Singapore.  These are incredibly handy and I have many more in the works: for all the crap little things in my studio and all the markers, crayons and glue sticks that are under the couch.  I thought you would like to make some too, so I whipped up a tutorial. Here you go:

Materials:
28 oz. tin can (if you have a different size can, just measure the height and circumference, add seam allowances, and the rest is the same)
linen, or other fabric
lining fabric
embroidery floss
glue (I used rubber cement, but plain white glue should do just fine)

Directions:

Wash your tin can and take off the paper.  Cut two 13″ X 4.75″ rectangles–one from linen and one from the lining fabric–and one 13″ X 1.5″ strip of linen.  Embroider the design of your choice on the fabric or leave it plain if you like. Place the two large rectangles together right sides facing, and sew around using a 1/4 inch seam allowance.  Leave a 2 inch opening in the middle of one of the short sides for turning out.  Clip the corners, turn and press (I like to press it so a little of the lining shows).  Sew the opening closed.  Fold the strip of fabric in half the long way and press.  All the way along one side clip almost up to the fold.  Glue the unclipped side to the inside of the tin can, then glue the outside.  Wrap the finished piece around the can and sew shut (I like my stitches to show, but you could of course use an invisible stitch).

I was planning on having a pdf file with embroidery designs you could download, but I’m not having much luck with that at the moment.  Until I figure it out here are pictures of the designs you can print out and use (you will probably have to resize them a bit). If you want to see these or any of the instructional photos more clearly, click over to my flickr site.

Edited to add: please click here and you can download both sets of designs for your own stylish, embroidered tin can cover.

drop me a line if you make one!

elphanso

Elphanso it is! thanks to the woman behind the bird bath for the great name.  He’s up in my shop and entered in the 2nd annual softies awards too.  Wish me luck!  And because I can’t muster up the energy to get off the couch I will play along with a little meme that I have been tagged for by fiona of fede (blog and shop). She makes some pretty fantastic soft hammer rattles, that you should go see.  Okay here goes:

4 jobs:

baker
nanny
bed and breakfast manager (mostly cleaning toliets and ironing! sheets)
chocolatier

4 favorite movies:

amadeus
fight club
grizzly man (and everything by werner herzog)
pirates of the caribbean

4 places I’ve been:

jerusalem
copenhagen
istanbul
the corn palace

4 places I’ve lived:

athens and
rome, briefly
bodega bay, ca
a little cabin with no running water and no electricity

4 favorite tv shows:

law & order in all their many incarnations
lost, when it’s on
the office
30 Rock

4 favorite radio programs:

this american life (who doesn’t like this?)
all college radio programs and their awesome college hosts
a prairie home companion, because if you were born in MN you must listen to this
marketplace on npr

4 favorite foods:

chicken livers
french macarons
nueske’s bacon
brioche

4 places I’d rather be:

in my sewing room
turkey
japan
in a bar with all my old friends

I’m supposed to tag 4 people, so I’ll tag the first four people with blogs that commented on my last post (suckers!).

anna

jenna

jodie

tanaya

drawstring bags

I never did say that I sold one of my diggers, but I did! And on my birthday to boot! My little floral digger was sent off to Jen at scissorspaperglue and I sent the polka dot digger off to New York yesterday morning. I knew I wanted to make the packaging for my toys and after a little brainstorming I came up with this simple drawstring bag. It’s made of muslin and I figured out how to do french seams just so I wouldn’t have to line it (they’re not really hard at all you just have to get over putting wrong sides together, but corners I had trouble with–anyone out there have any advice?). I also get to use my automatic button holer (holer, really? hole maker maybe?) which makes me feel like I know what I’m doing–always a treat. At first I wanted to embroider “my digger,” but found some passable stamps at Joann’s instead. It gives me a place to put the name of my shop as well. And I finally got my felt rocks up in the shop and made a small linen drawstring bag for them too.

The rocks turned out nice, I think, but they are less for the diggers and more for decoration really. I really like the moss covered ones and I may just do a couple set of those. But back to the drawstring bags. For a while now I’ve had the idea to make simple drawstring bags for toys. There are just so many damn toys and our toys are getting smaller and more complicated now–they need to be contained! The bags would be made of linen or a linen/cotton blend or even just muslin, and maybe lined or not lined, and with trains or blocks or dinosaurs or animals on the front either stitched or appliqued. And the reason they aren’t made yet is because I can’t decide on anything. Is linen too precious for a toy bag? Is muslin too cheap? Would embroidery get snagged or does applique look too slapped together? Would you even buy a toy bag? I need some feedback from the mamas (and papas) out there. I have a little craft fair coming up in march (!) and I think this would be something I could make a bunch of and that would go over well (the craft fair is also a children’s clothes and toys consignment sale–it’s called half pint resale and my very talented and energetic friend put it all together!). So leave a comment and help me decide, because I’ve been thinking about these silly little bags for too long now.