Posts Tagged ‘guest post’

guest post: ways to use pintucks

I’m very happy to have Sascha from Piccoli Piselli (it means little peas!) here today to tell us a bit about pintucks. Sascha is a very talented sewer who cranks out fantastic clothes for all three of her kids. She is a wiz with knits and totally hilarious to boot!

* * * * * * * * * * * * * * * * * * * * * * * * * * * * * * *

Hi there! Sascha here from Piccoli Piselli. I thought I’d show you some creative ways to use pintucks and pleats in children’s clothing.

A few years ago I made this top with freestyle pintucks on the bottom of the sleeves.

ever since then I’ve been meaning to experiment a little more with pintucks. Generally pintucks are sewn with a special pintuck presser foot and a double needle.

I’ve never gotten around to buying one that fits my machine and then I’d be limited to the fine, evenly spaced pintucks (which are beautiful and can be used in children’s wear in so many ways, especially heirloom garments).

So here’s some ideas for adding pintucks and pleats to your sewing:

I know it’s difficult to see from this photo, but I added pleats to the A-line dress as well as the pocket. For the dress I decided that re-drafting the front to accommodate the pleats would require too much math, so I stitched pleats to a piece of fabric that would roughly cover the size of the front panel of the dress.

Here’s a better picture of the pleats. What you do to create the pintucks or pleats is really pretty simple:

  • First you press down the length of the fabric where your first fold will be (wrong sides together).
  • Then choose the size you want you pintuck/pleat to be. On the dress above I made them about 3/8″ wide.
  • Stitch down the length of your fabric.
  • After stitching one row, take the fabric over to your iron and press fabric open.
  • Next you want to determine how far apart each pleat will be. Again, I’m no fan of math so I kind of just picked where it looked nice.
  • Fold your fabric again (wrong sides together) and press.
  • Continue with the stitches until you’ve created the amount of tucks you need.

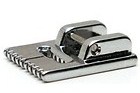
Here is a photo of some smaller pintucks I made for the pocket on the dress (I ended up making another set for the pocket with wider pleats to match the dress). I used this little measuring tool during pressing which really helped. I have no idea what it’s called, but I use it a lot in sewing.

When making small pintucks it can be a little difficult to keep the fine lines parallel. I guess the smaller pintucks would be better off sewn with a pintuck presser foot, but honestly the set I made above turned out pretty nice and I didn’t end up pulling out too much of my hair.

Here’s what I call “freestyle pintucks”. I wanted to go for a more wavy look (better luck next time) but I like the different widths I created here. I stitched the tucks across the grain of the corduroy. I think this is a great way to embellish boys clothing. Kristin from Skirt As Top did a great tutorial for how to make elbow patches yesterday. Just use her tute to add the patches to the knees of the pants.

Here is another pleat variation. Again, I made the pleats on fabric and then laid my pattern piece on the fabric and cut as usual. Can you see something odd in the left photo? Yup, I forgot that corduroy has a nap like velvet. It’s not too bad in person and as you can see by the photo on the far right, Vinny is happily wearing the pants. This is the best only photo I could take of him wearing any of the clothes I created for this post. He’s gotten very camera shy these days.

I saved my favorite for last…

For this pair of pants I actually did not stitch the tucks before laying/cutting the pattern piece. What I did was add the amount I guestimated I would use in the tucks onto the side seam of one of the pant front legs. This doesn’t always work because of the way patterns are drafted. Most of the time the subtle curves of a pattern will be compromised by adding width nilly willy like I did. This definitely would not have worked for the A line dress above. Especially when you have a pattern with facings that need to fit perfectly. I’ve worked with these pants so much I was comfortable making the changes. Before stitching my pant leg closed I attached the car patch. I was too lazy to get out my fusible web so I used fabric glue instead. Mistake. It bled through and now shows permanently on the finished patch. Lesson learned. Hey, that’s what I’m here for. At least you learned today that fusible web is better than fabric glue for applique and corduroy has nap. Yourwelcomeverymuch.

Thanks for having me Meg!

guest post: tutorial for a cuffy outfit

I want to welcome Sophie from Roubidou as our first guest poster this week! I have been watching her sew tiny, beautiful clothes all through her pregnancy: quilted jackets and fuzzy vests and amazing ensembles! Even though she was very, very pregnant, she agreed to write up a tutorial for us. And wow, what a tutorial it is! A cuff is a lovely detail and now you can put it on a shirt, a jacket, a pair of pants, or all three. After you’ve finished reading the tutorial she made, go have a look at the lovely baby she just made! Congratulations Sophie!
* * * * * * * * * * * * * * * * * * * * * * * * * * * * * * * * * * * * * *

Hello dear Elsie Marley readers,

When Meg asked me to do a little tutorial for KCWC I was pleased as punch not only for an opportunity to be a guest on one of my favourite blogs but also to be part of this autumn’s sewing frolic after all (our daughter is supposed to arrive on the 10th). I sewed the outfit to introduce three slightly different types of cuffs and hope you can follow the instructions without too much effort. I’m a self-trained dilettante so the tutorial below is merely what worked for me.

Happy KCWC,

Sophie

* * * * * * * * * * * * * * * * * * * * * * * * * * * * * * * * * * * * * * *

Shirt:

1. Sew the shirt as indicated by your pattern ignoring the instructions for the sleeve finish. Look at the given seam allowance and the sleeve finish method of the pattern, calculate the length of your cuff plus seam allowance to determine how much you’ll shorten the sleeve before adding the cuff and placket. To save fabric you could do this before cutting the fabric. If you have your little client ready and willing have her/him put on the garment to tailor the sleeves according to his/her measurement.

2. Make a pattern for you placket and cut out the placket twice (you’ll want mirroring plackets unlike the ones in the photo).

3. Place the placket with its ride side onto the wrong side of the sleeve and sew a little rectangle. Slash through the placket and sleeve down centre right between the stitches and carefully clip to the corners of the rectangle.

4. Turn the placket to the right side of the fabric and press. Now it’s likely to become a bit finicky. I very much prefer sewing for kids since it is so much quicker, pieces are easier to handle and you need less fabric. But sewing this placket, especially for a size 2 shirt, I wished I was sewing an adult sized shirt. To help you through this fabric origami it might be good idea to have a ‘real’ shirt with a placket lying next to you for visual guidance.

5. Fold back the long edge of the shorter side of the placket and pin in place. Then sew the folded edge in place stopping at the top of the gap. Tie the thread ends securely on the wrong side.

6. Next, fold the other side of the placket across the shorter side and press under the long edge. Fold back so that the pressed-under edge is on the sewing line and pin in place. Now, fold under the top pointed end,and press. Sew the long folded edge and make sure the underside of the placket is not caught in the stitching. Stitch an X at the end of the placket. Finish by tying the thread ends on the wrong side.

7. Now, gather the sleeve, stitching along the sleeve line with the longest stitch available on your sewing machine. Pull on the threads to manipulate the sleeve.

8. Cut out the cuff in the desired size. I used a one-piece cuff cut from the fabric in one piece and applied fusible interfacing to the half of the cuff that will be the upper cuff. Fold the seam of the non-interfaced side and press. Next sew the cuff onto the sleeve, right side to right side and trim the seam allowance. It’s important that you have an overlap as large as your seam allowance on both sides.

9. Fold and press the cuff to itself, right side to right side, so the folded side of the cuff comes to the sleeve-to-cuff seamline. Sew the ends in line with the two openings, cut the seam allowance, and press the seams open.

10. Trim, turn and press the cuff to the right side. I sewed the folded under cuff in place by machine, but if you want an invisible finish for your could,  hand stitch the folded edge on the inside with a blind-stitch or a slip-stitch.

11. Make a buttonhole on the upper side of the cuff and sew a button on the underside of the cuff. Repeat for the other sleeve.

Jacket:

1. Sew your jacket bearing the same alterations in mind as with the shirt.

2. Now on to the band cuff. Cut the cuff in the desired size, you’ll have two pieces of different fabric per cuff. Since the outside fabric is already thick I didn’t use fusible interfacing, depending on your fabric you might want to apply interfacing to the upper cuff. Pin the two pieces together, right sides facing, and turn under a seam allowance on the under cuff and press. Stitch the lower edge together. Trim and press open the cuff. 


3. Then sew the short side ends together, trim and press again. 

4. If you want to gather the sleeve before sewing on the cuff, do so now. Then sew the sleeve to the upper cuff, right sides facing. Trim and grade the seam. 

5. Press the seam allowance towards the cuff. Turn the cuff inside along the foldline, wrong sides facing. On the inside of the sleeve sew the under cuff in place either by machine or handstitch.

6. Repeat for the other sleeve and that’s it. 

Pants:

1. This cuff is sewn very similar to the shirt cuff. The main construction difference is that this is a lapped cuff which is used for bound or faced openings. I didn’t use any of these openings since I lined the pants and had my raw seams of the opening sandwiched between the lining and the main fabric. With a lapped cuff you’ll have to sew the cuff onto the knee sleeve with an overlap where the button will be. Sew your pants bearing the same alterations in mind as with the shirt

2. Now to the cuff. Start by sewing a line of piping (with your zipper foot) long enough for two sleeve cuffs. Then cut the cuffs in the desired size (i simply used a cereal bowl to trace the round edges). You’ll need four pieces altogether, I used the same fabric inside as outside in order not to distract from the piping. Pin the piping to the right side of one sleeve cuff. Stitch close to the stitching line on the piping, sewing with your zipper foot.

3. Turn under a seam allowance on the under cuff and press. Place the under cuff over the piping, right sides facing an sew the outer line of the cuff close to the previous stitch and the piping again with your zipper foot. Trim, turn and press the cuff.

4. Now attach the cuff to the knee sleeve as you did with the shirt but leave a seam allowance on one side and an overlap (long enough for your button) on the other side. Sew the cuff to the knee sleeve as you did with the shirt. Fold and press the cuff to itself, right side to right side, so the folded side of the cuff comes to the knee-sleeve-to-cuff seamline. Sew the shirt end in line with the opening and trim. Sew the overlap end along from the knee-sleeve to-cuff-seamline and then down to the cuff. Clip the corners and press the seams open. Push to the right side and finish the edge of the under cuff either by hand or machine.

5. Make a buttonhole on the upper side of the cuff and sew a button on the underside of the cuff. Repeat for the other knee sleeve.

And ready is a cuffy outfit.

from the north country: fox and owl

It’s been so fun to read these wintry posts.  I like winter for many of the same reasons as my fellow guest bloggers but  I think mostly  I like it out of necessity…otherwise I’d be crabby straight through from October to May.  Getting outside even just for a bit is a high priority for our family but there are some days (like today) up here in Minnesota where it’s just too cold to have much fun outside.  On these days crafts and art projects are in order, so here is a fun sewing project for grown-ups and young sewers alike:

A Stocking Cap for a Small Friend (my first tutorial!)

Cut off the cuff and a couple of inches of sleeve from an old sweater.  A sock would work very well too.


Turn the piece inside-out and do a running stitch about 1/4″ from the cut edge with strong thread all the way around the top.  Pull tight and secure with a knot.

Turn it right side out and fold up the cuff a bit…hey look, it’s already so hat-like!

Now make a little pom pom.  There are lots of places to lean how if you have never made one before…like here.

I like to felt my pom poms a bit by rubbing them between my hands in warm soapy water.  This step is not necessary but I think it looks super cute and helps scale down your pom pom.  The yarn must be wool in order to do this step.

Now stitch the pom pom to the top of the hat.

finis

<<<<<<<<<<<<<<<<<<<<<<<<<<<<<<<<<<<<>>>>>>>>>>>>>>>>>>>>>>>>>>>>>>>

I’m Erika from Fox and Owl.  I make dolls and animals and drawings and have a little blog where I talk about art and craft and show lots of gratuitous pictures of my adorable children.  Come visit me there sometime!

Thank you Meg for letting me be a guest on your excellent blog!

From the North Country: Beeper Bebe

I’m with Rae (see previous post).  I too get a little crazy this time of year when I am cooped up inside for too many days with my kid.  When I find my son is doing dismounts from the back of the sofa, the living room looks like  the aftermath of small cyclone, and I am contemplating a glass of scotch even though it is barely noon, well, I know it is time to put on our boots and find some distraction outside the house.

This is where living in a city comes in handy .  Aside from the library, one of our favorite places to visit is the Minneapolis Institute of Art.  My boy has been really, really into drawing lately and has been interested in the work of other artists, so on our most recent visit we took along a sketch book and some colored pencils.  I told him that when he saw something he really liked, we could grab a seat and he could do some drawings of that piece of art.  Now, I admit, I thought he might balk at the notion of slowing our pace through the gallery (because when you are 6 and a boy, it is all about moving at roughly the speed of sound–and maybe throwing a couple of karate kicks in there), but he was actually really excited by this idea.  So off we went and you can see some of the resulting sketches.

Which brings us to this little tutorial I have for you–it is a scenic patchwork sketch book.  And what the heck is that, you ask?  Well, just a Moleskine cahier notebook (I used the x-large plain version–they come 3 to a pack)  customized with a nice little patchwork of fabrics that together form a scenic sort of design.  So the world is your oyster in terms of what you work out for your design here–you can see I did woodland and city themed notebooks below–but it could be anything from outer space to the circus to school…or whatever.

Oh, and I also thought I would share the photos of these sketchbooks I made last Christmas as gifts for a few of the kiddies in my life–just because having some options is always nice.  They use the same essential technique but are monogrammed with the first letter of the child’s name.  Simple.

Want to make some for yourself?  You can download the instructions for the scenic patchwork sketch books here:

DOWNLOAD SCENIC SKETCH BOOK INSTRUCTIONS

And just remember, if the sketchbook fails to provide enough distraction when you start to get cabin fever and your kids are bouncing off the furniture, there is always scotch (no further commentary necessary, Meg–or Rae).

———————————————————————————————————————

Outfitted with sketchy knowledge of toy design at best and a hand-me-down sewing machine, I began designing plushies back in 2005, naming my little company Beeper Bébé.  Today, I design all manner of toys and other things, usually incorporating recycled stuff, and love to share tutorials on my blog.  I live in Minneapolis.  Future goals of mine include moving to France with my family, becoming a cowgirl, finishing that novel I started writing 15 years ago, learning to quilt, redesigning Little People for Fisher Price so that can be as cool again as they once were, and drinking scotch on my back step—not necessarily in that order though. You can find more of me at: http://chezbeeperbebe.blogspot.com/ and buy the stuff I make at http://www.etsy.com/shop/beeperbebe.  Hope to see you around some time.