Archive for the ‘tutorials’ Category

wooden tangram tutorial

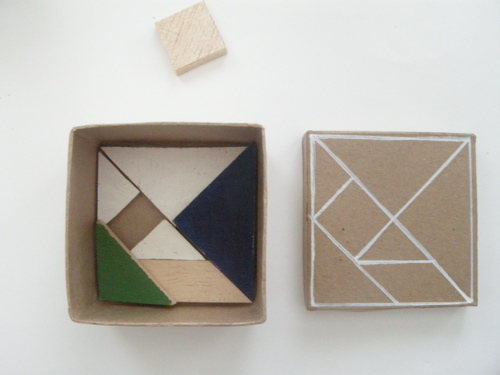
I’m sure you know what a tangram is but didn’t know it was called a tangram (when I looked it up, I think I might have typed, “that clever triangle-y puzzle thing”). If you’ve never even seen one, well then: it’s sort of a puzzle and sort of a game that involves five triangles, one square, and one parallelogram.  The objective is to figure out how to make a given shape, which is shown only in silhouette, using the pieces and not overlapping any.  My kids and I had a blast just playing around with the shapes and seeing what we could make. I thought you might like to make some too:

Materials:

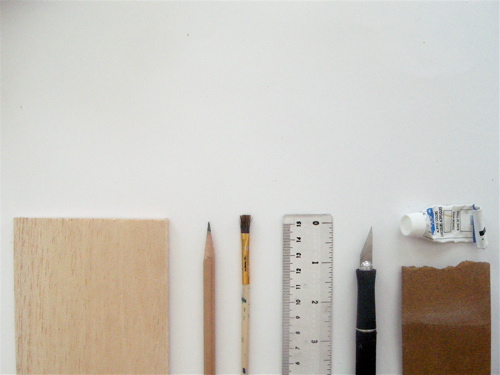
  • balsa wood (or sturdy cardboard, foam core, or actual wood wood, but you will need different tools for cutting the wood)
  • a sharp pencil
  • ruler
  • exact-o knife
  • fine grit sandpaper
  • paint brush and paint (optional)

Directions:

1. Use an exact-o knife to cut the balsa wood into a 4 inch square.  The piece of balsa wood I got at Michael’s Crafts was 4 inches wide already, so I only needed to cut it once to make a square.

2. Next you need to draw a 1 inch grid on the square very, very lightly. Draw a line one inch from the edge, then another one inch from that, one more and then turn the square 90 degrees and do it again. If you press down on the balsa wood at all it will make an indentation that won’t come out, so keep the pencil marks very, very faint.

3. Now we are going to draw 5 lines. I think it would be more confusing for me to explain where all the lines are drawn, so you can just follow the series of lines I drew above. Use the grid as a guide: draw through the corners, or on the lines, whichever is indicated by the picture. The first picture is the grid and the next five show the sequence of lines to draw.
4. Lightly erase the grid.
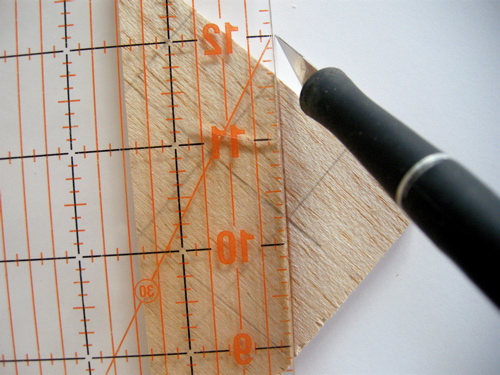
5. Take your exact-o knife and ruler and cut on the lines. Cut the shapes out in generally the same order you drew the lines. If you have a sharp blade it should take 3 or 4 passes along the line to cut through the balsa wood. It helps if you start a little above where you are cutting, instead of starting right on the line. Go slow and try to keep the blade perpendicular to the wood.
6. Lightly sand the pieces.

7. Paint (if you like). It’s nice to have both sides painted–especially the parallelogram–because it makes it easier to make more pictures with your tangrams, but I think they are equally beautiful not painted at all.  It’s up to you.

You can even make a little cute box for your new tangram set to go in. The box I got was a little too small for the pieces to fit just right–oh well.  Now go play: you can make animals, letters, quiltscookies even and this book looks lovely too. Watch out though, you might get carried away:

the quick little bunny tutorial

quickbunny

I really wanted to make the sock bunny that Heidi (from My Paper Crane) created, but I didn’t have any of those fantastic red and brown monkey socks. What I do have is baby socks: tons of cute, mismatched, totally useless, never stay on baby socks. Now that my littlest is very much not an infant and too soon will be a toddler it seems kind of silly to keep all those teeny tiny socks. So I made a bunny out of them. And a tutorial too.

DSCN1529 DSCN1537

This is indeed a quick little bunny. After I figured out the pattern, start to finish each bunny took me just 15 minutes.  So if you are anything like me and never get around to the easter baskets until the night before, you can whip up this little softie and still have time to run to the drugstore to score the last bag of jelly beans.

The quick little bunny tutorial

DSCN1486

Materials:

  • baby sock
  • a handful of stuffing
  • heavy duty thread
  • scissors

Make that bunny:

Before you start sewing take second to look at the sock you have. Most of the foot part will be the body and the heel area will be the head. Yours might be a little different, depending on your sock. If you look at the picture below you can almost see the bunny already.

DSCN1495

the body:

Take some stuffing and stuff the foot part of the sock–not too tight! this is just a little, squishy baby bunny. Where the foot part ends and the heal begins sew a running stitch around the sock and pull to gather it. I like to wrap my thread around where I’ve stitched a few times just so it’s secure. Knot your thread and snip.

the tail:

DSCN1498

On the top of the bunny’s back,  sew a circle about an inch in diameter with a simple running stitch. Then pull to gather. You may have to mush the stuffing around so you can pull it tight  to make a tail shape. When you have a little bunny tail, wrap your thread around a few times and knot off (do people say “knot off?” does it sound too much like I’m yelling at you to go “knot off!”).

the head:

DSCN1504

To make the head, put a little stuffing inside the sock and sew a running stitch around the top of the heel. Before you pull it taut make sure all the stuffing is pushed down under your stitches. Then wrap the thread around and knot off!

the ears:

DSCN1508

Cut a big V shape out of the top of the sock. Now trim the top part of each ear to a point.  Then fold the two sides of the bottom part of one ear in to meet and sew together. This is a little easier to understand when you look at a picture:

DSCN1509 DSCN1511

When you sew that seam down the middle of the ear, it’s good to catch some of the back of the ear with your stitches, so the ears are a little thinner.

The attitude:

Okay, that is a dorky title, but this is the fun part. Now you can play around with the ears and the head, moving them to where you want and putting a stitch here and a stitch there so they will stay.

DSCN1515

You don’t have to give your bunny an attitude, but you should stitch the back of the head to the body a little, so it looks more bunny like and less like a cinched up sock. There! you did it! Now go dig around in the sock drawer and see what else you can make into a bunny.

DSCN1538

boy belt tutorial

My middle son is jumpy and crazy and skinny and tall–all of which make his pants fall down quite often (if he is wearing pants that is), so I thought I’d make a belt for him. In honor of Celebrate the Boy month at Made and Made by Rae I  drew up a pattern to share with all of you.

The finished belt is 1 1/2 inches wide and adjusts to fit waist sizes of about 20 inches to 24 inches. To make a different size take the waist measurement you want to use then add 8 inches: the main fabric will be (waist size + 8)inches by 3 1/2 inches and the lining fabric will be one inch shorter.

Materials:

DSCN1058

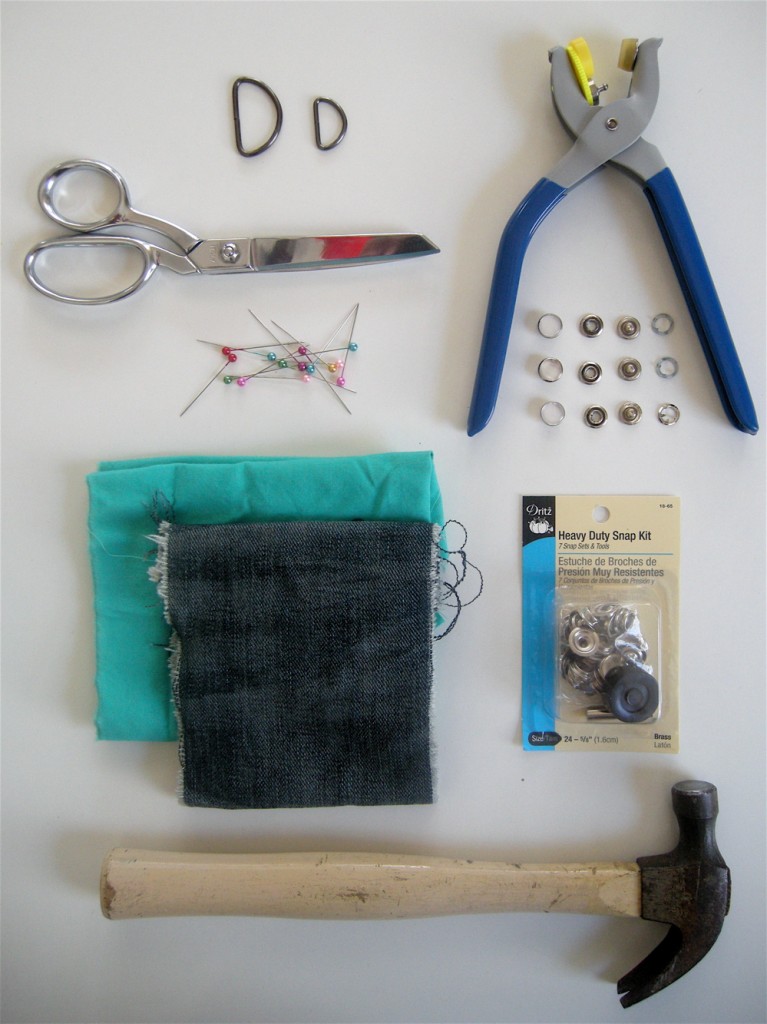
  • one piece of fabric cut 30 inches long and 4 inches wide, preferablly cut parallel to the selvege, but as long as it’s not cut on the bias it will work out just fine.
  • one strip of canvas or denim (or something that is a similar weight) 29 inches long and just shy of 1 1/2 inches wide.
  • three snaps and snap setting tool
  • one 1 1/4 inch D-ring
  • scissors, pins, iron, sewing machine

Steps:

  1. Fold your strip of fabric in half the long way (wrong sides together) and press.
  2. Open the fabric back up and with the right side down, fold the top edge down 1/2 inch and iron, then fold the bottom edge up 1/2 inch and iron.
  3. Set your strip of canvas or denim on the bottom half and fold both short ends over it and press
  4. Miter your corners: fold the corner diagonally, so it makes a right triangle where the middle of the longest side (the hypotenuse if you paid attention in geometry) of the triangle lies on the point where the folds of the short end and the long side meet. This makes much more sense if you just look at the picture. And this is just how I do mitered corners, of course you can do it any way you know how.
  5. Sew all around the belt anywhere from 1/8 inch to a 1/4 inch from the edge–whatever looks best to you.
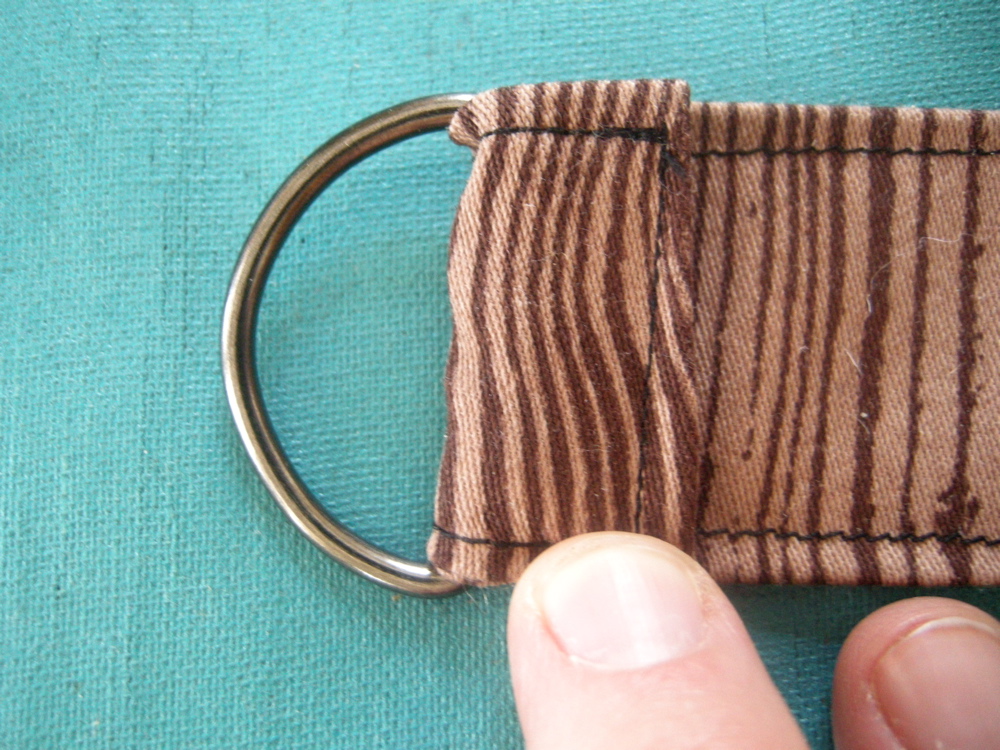
  6. Pick one side of the belt to be the right side (the one that will face out) and put that side down. Slide the D-ring onto the left end of the belt, fold the end over it one inch and sew down. Sew back and forth a few times to make sure it’s secure.
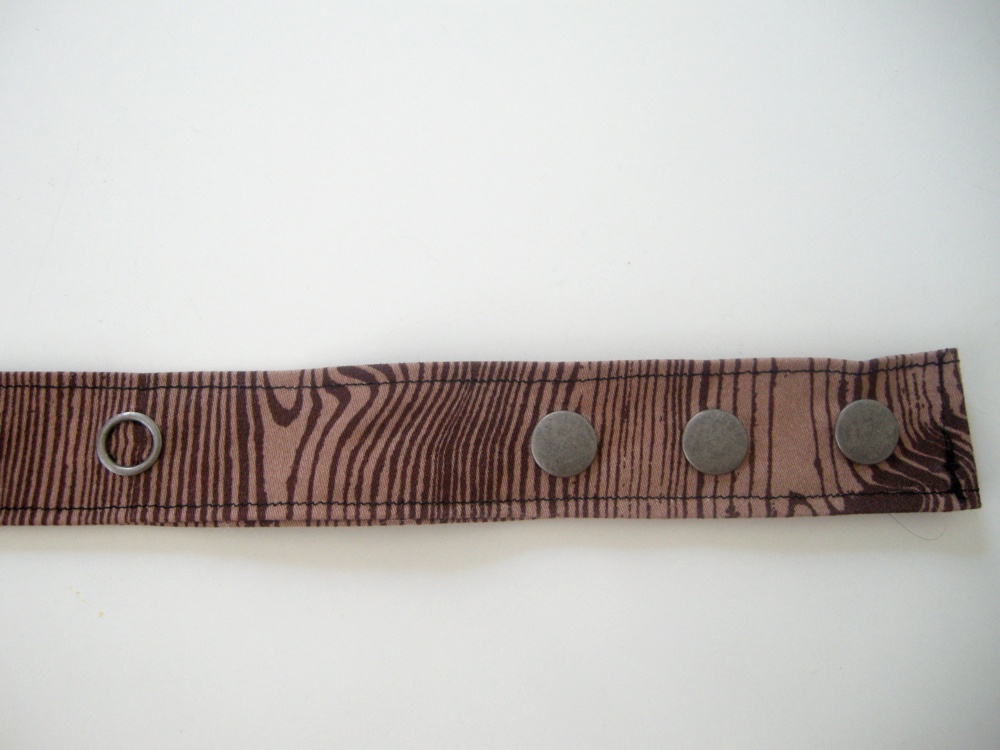
  7. Now for the snaps (I used heavy duty snaps for the wood grain belt, but there are a lot of options out there). With the right side down again and the D-ring to the left, attach the top part of three snaps: the decorative part on top and the male part (for lack of a better term) of the snap on the right side of the belt. The snaps should start about 1/2 from the end and be about an inch or so apart.
    DSCN1069
  8. 6 inches to the left of the last snap attach the bottom part of the snap: the female part of the snap should go on the right side of the belt and the very bottom piece of the snap should go on the wrong side  (the side that will face in). This seems wrong, but it’s not. The belt will go through the D-ring and then fold back on itself and snap.
  9. Find some pants with belt loops and try that sucker out!  Look at you, you just made a belt!

Variations:

  • To make a skinnier belt, your fabric strip should measure 30 x 2 1/2 inches and the lining should be 29 x 3/4 of an inch. Then just follow the directions for the wider belt.
  • I thought it would be nice to have a fabric buckle for baby belts (yes, it’s ridiculous I know, but so are baby sneakers and I bet you have some of those) so the metal doesn’t jab their pudgy tummies, or if you don’t have a d-ring around, or if you’d just like to make a cool fabric buckle, whatever, this is how you do it:
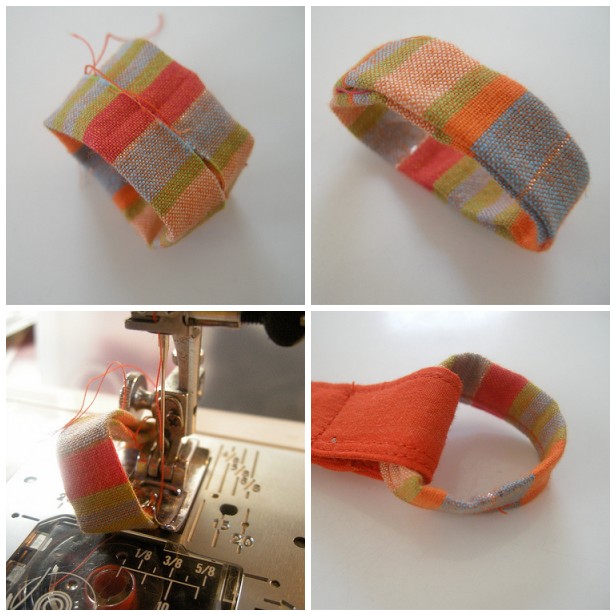
    Cut a piece of fabric that is 6 x 2 inches (for the skinnier belt, cut 4 x 2). With right sides facing sew the ends together, so you have a small fabric ring, then fold both the edges in (wrong sides together) to meet each other in the middle. Fold in half again and sew. It’s easiest to sew with the loop going up over your presser foot than the other way around. Attach the fabric buckle just like you would the D-ring, making sure the seam is hidden under the fold and the nice side is facing out.
  • Buttons! Sew button holes where the snaps would go and then sew some buttons on.

There are so many other things that can be done with this belt: topstitching, grommets, snaps all around, a matching mama belt! If you make one from this tutorial (or any other tutorial of mine) remember to add it to the elsie marley flickr group.  And please add a photo or two to the Celebrate the Boy group on flickr too!

Go Boys!

lattice top tutorial

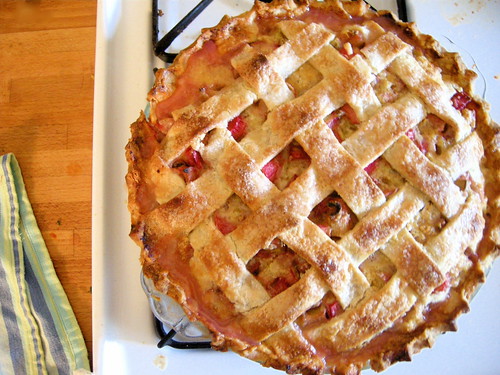
I made a rhubarb custard pie yesterday after picking up some lovely rhubarb at the farmer’s market. My mother made this pie every spring and would always say that it proved the existence of god. And really it is damn good. The recipe is from Betty Crocker and it’s quite simple, but the lattice top makes it look extra impressive.  I took some pictures while I was putting the pie together and though I’d share a little lattice top tutorial so all your pies can look fancy fancy too.

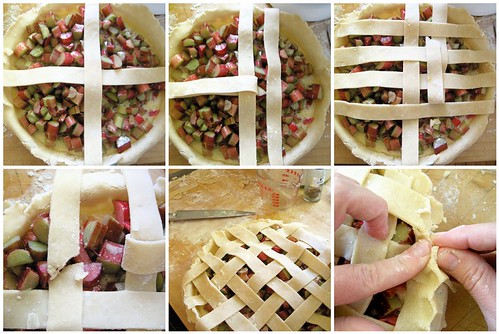
Make enough pie crust for a 2 crust pie (there is a good recipe here). Roll half out and line your pie pan, put you filling in and pop it in the fridge while you roll out the other half of the dough. Roll the second half out just like the first: about an 1/8″ thick and slightly bigger than your pie pan. Cut the whole thing into one inch strips. Now place two of the longest strips in the middle perpendicular to each other. Fold the strip that is underneath back over the strip on top and add another parallel to the one on top about a half an inch away. Continue weaving the strips by folding every other strip up and putting a new strip in. If your strips are broken or you don’t have enough long ones, just hide the broken bit under another strip and no one will ever know. When you’ve covered the whole top, seal the pie by pinching the top and bottom crusts together (two fingers on the outside and one on the inside, just like the picture) around the whole pie. With a sharp knife cut all the excess dough off and stand back and admire your work. Before putting in the oven be sure to brush the top with cream (or egg wash) and sprinkle with sugar. This will make the lattice top look even better.

Rhubarb Custard Pie
from Betty Crocker

3 eggs
3 Tbsp. milk
2 cups sugar
1/4 cup flour
3/4 tsp nutmeg
4 cups cut-up rhubarb
1 Tbsp butter

Beat the eggs and milk in a large bowl. Mix the sugar, flour and nutmeg together and add to the eggs. Mix well. Add the rhubarb and stir. Pour into your prepared crust. Dot with the butter. Cover with lattice top. Bake for 50-60 minutes at 400 degrees (Fahrenheit) until nicely browned. Serve slightly warm (with vanilla ice cream!) or cold for breakfast the next day.

string of lights advent calendar pattern

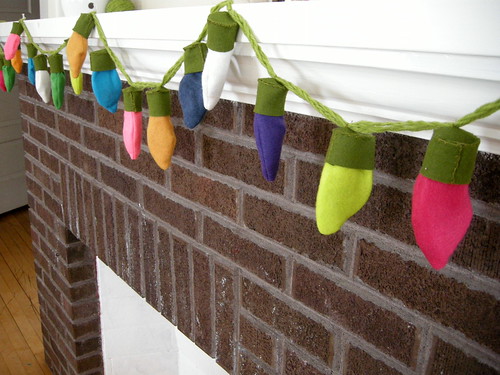
Here it is, the string of lights advent calendar tutorial (and pattern!). I made the pdf pattern file all by myself for the first time, so if you have problems with it just email me and I’ll try to fix it. Otherwise, hurry up! because advent is almost over!

materials

green wool felt
multi-color felt scraps
60 feet green yarn
green embroidery thread
lightweight treats (gum balls, dum dums, love notes, tiny ornaments)

pattern

download here

directions

Cut the yarn into six equal pieces (10 feet each or 120 inches each or about 3 meters each). Take three pieces and braid them together. This is more difficult then it sounds, but if you roll up the slack and just work with a little yarn at a time it’s much easier. Braid the other three together the same way. Then twist the two braids together and knot the ends.  It will stay twisted when you sew the lights to it.

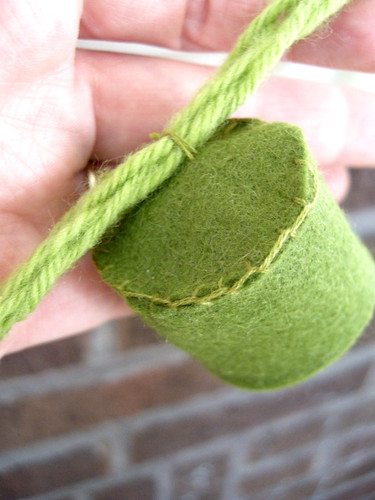
Cut out 25 (or 24 or however many lights you want) circles and rectangles. Create the socket by sewing a blanket stitch to the edge of rectangle and the circle attaching them to each other.  If the rectangle is slightly longer than the circumference of the circle clip it to fit and continue sewing the ends of the rectangle together. Sew the sockets onto the cord–one every three inches.

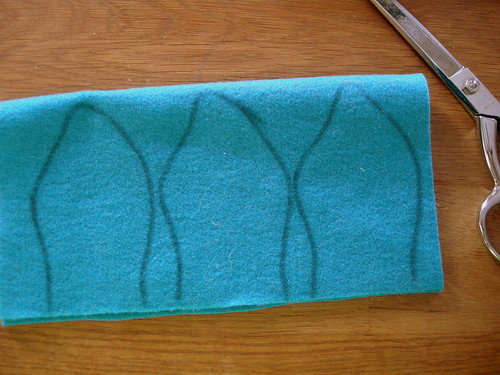
Cut out the light bulb pattern piece. To sew the lights up faster you can fold your colored felt over and simply trace the pattern onto it with a marker (permanent or not it doesn’t matter) then sew the two pieces together staying inside the lines.  To be safe test the first light to see if it fits: sew and turn out, put a treat or two inside, then fit it inside the socket and see if it stays when it’s hanging upside down. If it slips out, just make the lights slightly bigger.  If you’d rather use the lights for decoration and not for treats you can stuff the light bulbs lightly and sew them onto the socket.

I didn’t really finish the ends of the cord (I just tied a knot on both ends).  But it would be sweet to make a little plug out of felt to hide the knot. To do this cut out four extra “socket bottom” circles and two extra rectangles.  Cut a slit in the middle of one of the circles and insert your knot, then attach the rectangle, just like you did for all the sockets, and attach the other circle to the other side–making a  round (European style) plug. You can even make some prongs out of felt to complete the look.

download the pattern here.