Archive for the ‘holidays’ Category

snowmen

Yesterday we were buried under almost a foot of snow, so we made meringue snowmen.  I had this little project stored somewhere in the back of my brain for a while and it was the perfect day for it. I whipped up some meringue, piped them onto a sheet pan, and the kids decorated them.  We didn’t have much (and there was no going to the store) so I cut raisins up for the eyes and we used the 10 red hots that were left. I didn’t want to use chocolate chips because I thought they would melt. But now I’m realizing I should have cut up some dried apricots for noses! oh well. I also forgot the peppermint extract, so they don’t really taste like much, but the kids don’t care at all. The meringue is sticky as all get out, so it’s a good idea to wet your fingers a little before you start decorating.

snowman meringues adapted from martha stewart

  • 3 large egg whites
  • 3/4 cup sugar
  • 1/2 teaspoon peppermint extract (or vanilla if you don’t have peppermint)
  • raisins, currants, dried fruit, red hots, or whatever else you have on hand for decorating

directions

  1. Put egg whites and sugar in the bowl of an electric mixer. Set bowl over a pan of simmering water, and stir until sugar has dissolved and mixture is warm to the touch, 2 to 3 minutes.
  2. Transfer bowl to an electric mixer fitted with the whisk attachment. Mix on medium-high speed until stiff peaks form.
  3. Mix in peppermint extract (don’t forget)
  4. Put the meringue into a piping bag with a large tip (or a ziploc bag with a clipped corner, or just use two spoons). If you have a silpat, use it. If not put some parchment paper on a cookie sheet and “glue” the corners down with a dab of meringue. Then pipe three adjoining circles–a snowman, silly.
  5. Decorate and pop in a 175 degree (Fahrenheit) oven for two hours. They will look exactly the same when you take them as they did when you put them in.

This is turning into a tutorial week! Tomorrow I’ll have the directions for the string of lights advent calendar and who knows maybe I can rustle up another tutorial for Friday (but don’t hold your breath). Also, a couple people have emailed me asking whether or not the mobile swap is happening again this year. And yes! it is. Sign up will start in January. Last year it was a big success! And I’ve even got an idea for my mobile already.

how to make english toffee

This is my little bit for holidays at home.

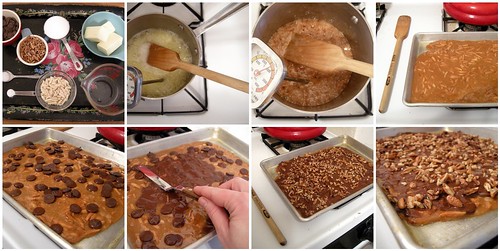
English toffee was the first christmas candy my mom made each year.  After we were done with all the Thanksgiving leftovers, she would make a huge batch and stick it all in the freezer. And I would spend the entire month of December sneaking pieces of it thinking no one would notice. I think probably half was gone by the time Christmas rolled around! So now I make english toffee every year for Christmas and though I still eat my fair share I try to give most of it away.  The recipe below makes a smallish batch–enough for a nice gift or your own personal use–but it is easily doubled or tripled.  Don’t be intimidated by the long (winded) directions, this toffee is easy and quick to make, I just wanted them to be extra clear.

ingredients
2/3 cup butter
1/2 cup sugar
1/3 cup water
1/2 tsp salt
2/3 cup blanched slivered almonds
1/4 tsp baking soda
1/2 cup chocolate chips or 2 small chocolate bars
1/2 cup chopped pecans

you will also need
saucepan
candy thermometer
cookie sheet  (I used a small one, but the size doesn’t really matter)
a silpat if you have one, extra butter if you don’t

directions

Before you jump right in, measure out all your ingredients so they are all ready to go. If you’ve never worked with boiling sugar before (or if you are prone to accidents) keep a small bowl of ice water next to the stove in case you burn yourself. Boiling sugar is super hot, so this isn’t one for the kids. If you have a silpat (and you really should get one–they are awesome) put in on your cookie sheet and you’re good to go. If not, butter your cookie sheet like crazy.

Now that everything is ready, put the sugar, butter, water and salt into your saucepan. Cook over medium heat, stirring occasionally, until it reaches 236 degrees Fahrenheit (soft ball) .  This will take a while and the chocolate chips are not there for you to snack on while you wait. The mixture will bubble up quite a bit.  It will stay around 200 degrees for longer than you think it should, but the temperature will shoot up quickly so don’t walk away. Make sure your candy thermometer is not resting on the bottom of the pan, but taking the temperature of the actual candy.

While you are waiting you can warm up the slivered almonds in the microwave. This will keep the candy’s temperature moving up instead of cooling down when you add them (but if you don’t have a microwave, you can skip it).

When the mixture is 236 degrees add the almonds. Stir constantly until it reaches 290 degrees (soft crack). The candy will turn a lovely amber shade and give off a nice, nutty smell. That when you know it’s done. I might have gone a tad too far with mine, but you’re not going to stop and take pictures while you cook.

Add the baking soda and stir.  Pour onto the prepared pan and spread it as best you can. Sprinkle the chocolate chips on top, wait a minute for them to melt and then spread them all over the top of the toffee. Sprinkle the chopped pecans on top of the chocolate and let cool.  You can speed up the cooling by popping the toffee in the freezer. When it’s completely cool break up into pieces and give away all that you don’t eat.

half eaten gingerbread man ornament

I made this half eaten gingerbread man last year, but I thought I’d post it again in case you are starting to freak out about how soon Christmas is (16 days). He’s super simple to sew up. I wrote up instructions and there is a pattern you can download too. If you’d like to see the other mutant gingerbread man I made click here and to know why I made them click here.

Plenty of you want a tutorial for the string of lights advent calendar, so look for that in a couple days. Now get off the computer and finish those christmas presents already.

advent calendar

Ta da! The advent calendar is done, well pretty much done. It’s a string of chirstmas lights.   One of you guessed correctly! But there were some good ideas out there: an advent abacus, a ferris wheel.  Next year.  There are only twenty lights, but I figure I’ll save some making for next christmas or add them if I have time this month (ha!). There are treats in the bulbs and the lights fit in their little sockets, but they aren’t held in by anything–just the power of felt.  This calendar is for lightweight treats only or bits of paper with sugarless activities on them. I went with candy because my kids are still young enough to think it’s the best thing in the universe.

I’d be happy to write up a quick tutorial (with patterns) if there are a lot of you that would like to make one. It’s not difficult at all.  The hand sewing is a little time consuming, but it’s nothing a few movies won’t fix. If you sewed the bulbs on it would make a nice Christmas decoration for this year (or next).  If you’d like to see more pictures of it you can click here and here.  And there are lots more fantastic calendars here and here.

happy thanksgiving

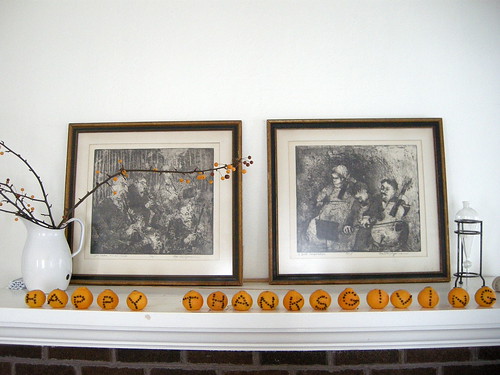
I have zero thanksgiving decorations, so I came up with this little project. It doesn’t really need any explanation, just push some cloves into some clementines and spell a word.  You could get all fancy with fonts and it might be good to sketch the letters on first. I just did it freehand (and I’m sure you can tell). Clementines have a thinner skin than oranges so it makes pushing the cloves in much easier. This is a great project for kids and a good spelling lesson to boot. My daughter is really into letters right now and  it went over big. I didn’t dry them so they won’t keep, but they still smell pretty. Now we just have to make some hand turkeys and we’re set!